Pull to Refresh Table View in Swift

Adding pull to refresh to a UITableView sounds like a lot more work than it actually is. The iOS UIRefreshControl makes it a quick & easy feature to implement. Today we’ll toss together a quick stock price list app and then add pull to refresh to get up to the second updates on demand. When we’re done it’ll look like this:

Pull to Refresh Table View
Read on →

Alamofire Custom Headers

A reader trying to hook up to a Mashape API using Alamofire in Swift just emailed to ask how to handle custom headers (Thanks Claire!). She needs to pass 2 headers with her GET request:

  • X-Mashape-Key: MY_API_KEY
  • Accept: application/json

This curl statement works:

curl --get --include 'https://mashape-community-urban-dictionary.p.mashape.com/define?term=wat' \
-H 'X-Mashape-Key: MY_API_KEY' \
-H 'Accept: application/json'

So how can we make this call work with Alamofire?

Read on →

Adding a Search Bar to a Table View in Swift

Previously we set up a Swift app that displayed info about Star Wars species from the Star Wars API using Alamofire. Today we’re going to add a search bar to the tableview so we can search through those species. We’ll start with a simple search of species names then add a scope bar to search other fields like the species classification and language.

Here’s what it’ll look like when we’re done the name search function:

Search Results
Name search function
Read on →

Custom Fonts in Swift

Eventually you’ll run into a designer who insists that the stock iOS fonts aren’t quite right for your app’s design. They’ll probably be right. Including fonts in iOS apps has gotten a lot easier in iOS8 since you can now preview them in your xibs & storyboards in Interface Builder.

First we’ll add the custom font to the Xcode project so we can use it in Interface Builder. Then we’ll set up the custom font programmatically in Swift code. We’ll programmatically set the font size based on the preferred font size that the user has selected in Settings.

Read on →

Loading UITableViewCell Images from an API

Previously we set up a Swift app that:

  • Pulled Star Wars species data from the Star Wars API using Alamofire
  • Took the JSON from the response and turned it into an array of Swift objects
  • Parsed some string, array, and date fields in the web service JSON
  • Displayed the results in a table view
  • Loaded more results as the user scrolled down in the table view
  • Passed the table view to a detail view, using a storyboard & segue. Tapping on a row in the table view opened a detail view displaying additional data about that Star Wars species

Today we’ll add another feature: Showing images of each species in the table view. We’ll do that by getting the URLs from a web-based API then loading the images asynchronously from the URLs. We’ll have to handle table view cells getting reused while we’re trying to retrieve the images. Finally we’ll set up a cache so we don’t have to pull down the images every time a cell gets reused. The images will get pulled from DuckDuckGo’s Instant Answers API. Read on →


Alamofire Authentication: Basic & HTTP Headers

tl;dr: Alamofire can be used to do Basic or HTTP header auth. Demo code for building a Swift app with a REST APIs using Parse takes about 2/3 of this post. Go straight to the core code for Basic Auth or HTTP header auth.

If you’re building an app based on a REST API you’re probably going to need to authenticate at some point. You might even need to authenticate to make any REST calls at all. Today we’ll set up a simple app using Parse as a backend. Using Alamofire, we’ll set up two types of authentication: basic auth and HTTP headers.

Authenticity required. Password?
photo credit: Authenticity required: password? via photopin (license)

Read on →

UITableView Updates to Maintain the Integrity of the Original Trilogy

Like I’ve said before, UITableView is the core of the user interface in a huge number of iPhone & iPad apps. It’s a pretty common pattern to set up a table view then later on need to add or remove some of the rows, like an email app needs to handle receiving new messages and deleting read messages. So today’s topic is how to do UITableView updates in Swift.

The naive approach is to simply update the data source (e.g., the array of email messages) then call myTableView.reloadData(). That approach works but it causes the cellForRowAtIndexPath to get called again for all of the rows, not just the ones that were added or deleted. The more efficient way is to only update the rows that were changed. Like the Star Wars movies, when you release the prequels, you don’t need to refresh the original trilogy.

Read on →

JSON Parsing & Detail View Segues in Swift

Last time we set up a Swift app that:

  • Pulled Star Wars species data from the Star Wars API using Alamofire
  • Turned the JSON response into an array of Swift objects
  • Parsed some string fields in the web service JSON
  • Displayed the results in a table view
  • Loaded more results as the user scrolled down in the table view

Today we’ll keep progressing on this app to add more of the features required in “real” apps. We will add:

  • Parsing JSON including arrays, strings to arrays and strings to dates (using a DateFormatter)
  • Passing data from a table view to a detail view, using a storyboard & segue. Tapping on a row in the table view will open a detail view displaying additional data about that Star Wars species

YodaParsing

Read on →

Hooking Up a REST API to a Table View in Swift

Aside: This tutorial doesn’t explain the basics of adding a UITableView to a Swift app. If you’re fuzzy on the details of implementing a UITableView, take a read through Apple’s docs or a a nice summary on StackOverflow. This tutorial is all about tying a table view to an API call returning an array of items.

The UITableView is the bread & butter of tons of iOS apps. Combined with access to a web service, it’s the core of apps from Mailbox to Twitter/Tweetbot to Facebook, even Apple’s Notes & App Store apps.

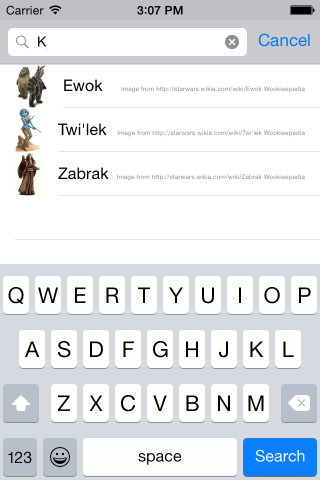
We’re going to create a table view that displays species from the Star Wars movies :) The lovely SWAPI.co lists tons of data about Star Wars so we’ll be hooking in to that. We’ll need to make a GET API call, parse the returned JSON, and set up a table view to display it. Since this API returns paginated data we’ll also implement loading the next page of results as the user scrolls down.

oprahtableview

Read on →

Strongly-Typed GET and POST Calls with Alamofire

Last time we used Alamofire to make some REST requests to a web service. But we’re still passing JSON around in our app. Today let’s improve that up by building a higher layer of abstraction by mapping the JSON to a strongly typed class. That’ll keep our code better organized so we aren’t struggling to keep too many details in our minds at once.

First, we’ll need a class to represent the Todo objects we’re dealing with. Create a new class in its own file to represent the Todo objects. It will have a few properties, an initializer to create new Todo objects, and a description function to print out all of the properties, which is handy for debugging:

Read on →