 Grok Swift
March 07, 2015 - Updated: December 06, 2016 - Swift 3.0
Last time we set up a Swift app that:
- Pulled Star Wars species data from the Star Wars API using Alamofire
- Turned the JSON response into an array of Swift objects
- Parsed some string fields in the web service JSON
- Displayed the results in a table view
- Loaded more results as the user scrolled down in the table view
Today we’ll keep progressing on this app to add more of the features required in “real” apps. We will add:
- Parsing JSON including arrays, strings to arrays and strings to dates (using a
DateFormatter) - Passing data from a table view to a detail view, using a storyboard & segue. Tapping on a row in the table view will open a detail view displaying additional data about that Star Wars species

This tutorial has been updated to use Swift 3.0, Xcode 8, and Alamofire 4.1.
If you haven’t been following along, you might want to grab the code that’ll be our starting point from GitHub (Swift3.0_REST_Tableview branch).
Or if you’d rather not type, grab the completed code from this tutorial GitHub (Swift3.0_Detail_View branch).
JSON Parsing: Arrays, String Lists, Dates
When our project is launched, it makes a call to the API to get a list of Star Wars species in JSON: StarWarsSpecies.getSpecies(). The data passes through a convenience function called speciesArrayFromResponse which:
- Checks for errors
- Parses the top layer of the JSON
- Turns the array of JSON elements representing Star Wars species into Swift
StarWarsSpeciesobjects
class SpeciesWrapper {
  var species: [StarWarsSpecies]?
  var count: Int?
  var next: String?
  var previous: String?
}

...

class StarWarsSpecies {
  // ...

  private class func speciesArrayFromResponse(_ response: DataResponse<Any>) -> Result<SpeciesWrapper> {
    guard response.result.error == nil else {
      // got an error in getting the data, need to handle it
      print(response.result.error!)
      return .failure(response.result.error!)
    }

    // make sure we got JSON and it's a dictionary
    guard let json = response.result.value as? [String: Any] else {
      print("didn't get species object as JSON from API")
      return .failure(BackendError.objectSerialization(reason:
        "Did not get JSON dictionary in response"))
    }

    let wrapper:SpeciesWrapper = SpeciesWrapper()
    wrapper.next = json["next"] as? String
    wrapper.previous = json["previous"] as? String
    wrapper.count = json["count"] as? Int

    var allSpecies: [StarWarsSpecies] = []
    if let results = json["results"] as? [[String: Any]] {
      for jsonSpecies in results {
        let species = StarWarsSpecies(json: jsonSpecies)
        allSpecies.append(species)
      }
    }
    wrapper.species = allSpecies
    return .success(wrapper)
  }
}
About half of the work done by that function is checking for errors and making sure we have non-empty valid JSON. Then we create a wrapper object to hold the data from the top layer of the JSON:
let wrapper:SpeciesWrapper = SpeciesWrapper()
And we grab the relevant values from the JSON to fill in the wrapper’s properties:
wrapper.next = json["next"] as? String
wrapper.previous = json["previous"] as? String
wrapper.count = json["count"] as? Int
as? String and as? Int try to convert the JSON elements to strings or integers. If the JSON element can’t be converted to a string or int, then we’ll get nil values in those elements.
Parsing the array of results is a bit more involved:
var allSpecies: [StarWarsSpecies] = []
if let results = json["results"] as? [[String: Any]] {
  for jsonSpecies in results {
    let species = StarWarsSpecies(json: jsonSpecies)
    allSpecies.append(species)
  }
}
wrapper.species = allSpecies
After creating an array that will hold our StarWarsSpecies objects (which are currently just chunks of JSON), we grab the JSON array (if let results = json["results"] as? [[String: Any]]) and iterate through the elements it contains (for jsonSpecies in results { ... }).
Each element in the JSON array is a dictionary and we’ve checked that using as? [[String: Any]] when we declare results. Since the StarWarsSpecies class has an initializer that takes a JSON array, we can pass each element in the JSON to that function then add the newly created StarWarsSpecies to our array of species objects.
The JSON parsing for all of the properties of a species happens in that initializer. Last time we stopped after parsing the few string properties that we needed:
enum SpeciesFields: String {
  case Name = "name"
  case Classification = "classification"
  case Designation = "designation"
  case AverageHeight = "average_height"
  case SkinColors = "skin_colors"
  case HairColors = "hair_colors"
  case EyeColors = "eye_colors"
  case AverageLifespan = "average_lifespan"
  case Homeworld = "homeworld"
  case Language = "language"
  case People = "people"
  case Films = "films"
  case Created = "created"
  case Edited = "edited"
  case Url = "url"
}

class StarWarsSpecies {
  var idNumber: Int?
  var name: String?
  var classification: String?
  var designation: String?
  var averageHeight: Int?
  var skinColors: [String]?
  var hairColors: [String]?
  var eyeColors: [String]?
  var averageLifespan: String?
  var homeworld: String?
  var language: String?
  var people: [String]?
  var films: [String]?
  var created: Date?
  var edited: Date?
  var url: String?

  required init(json: [String: Any]) {
    self.name = json[SpeciesFields.Name.rawValue] as? String
    self.classification = json[SpeciesFields.Classification.rawValue] as? String
    self.designation = json[SpeciesFields.Designation.rawValue] as? String
    self.averageHeight = json[SpeciesFields.AverageHeight.rawValue] as? Int
    // TODO: more fields!
  }
}
Now we need to build out parsing the different types of fields required. Here’s what the JSON for a species looks like:
{
  "name": "Wookiee",
  "classification": "mammal",
  "designation": "sentient",
  "average_height": "210",
  "skin_colors": "gray",
  "hair_colors": "black, brown",
  "eye_colors": "blue, green, yellow, brown, golden, red",
  "average_lifespan": "400",
  "homeworld": "http://swapi.co/api/planets/14/",
  "language": "Shyriiwook",
  "people": [
      "http://swapi.co/api/people/13/",
      "http://swapi.co/api/people/80/"
      ],
  "films": [
      "http://swapi.co/api/films/1/",
      "http://swapi.co/api/films/2/",
      "http://swapi.co/api/films/3/",
      "http://swapi.co/api/films/6/"
      ],
  "created": "2014-12-10T16:44:31.486000Z",
  "edited": "2015-01-30T21:23:03.074598Z",
  "url": "http://swapi.co/api/species/3/"
}
We’ve got strings, ints, arrays of strings (really URLs), dates, and some comma separated strings that are really lists (e.g., eye colors). Lifespan isn’t necessarily an int, it can be a string value like “unknown” or “indefinite” so we’ll have to handle that too.
Parsing JSON Strings & Integers
Let’s start with the easy stuff that’s similar to the wrapper fields from the top layer of JSON, finishing off the rest of the string & int properties:
required init(json: [String: Any]) {
  // strings
  self.name = json[SpeciesFields.Name.rawValue] as? String
  self.classification = json[SpeciesFields.Classification.rawValue] as? String
  self.designation = json[SpeciesFields.Designation.rawValue] as? String
  self.language = json[SpeciesFields.Language.rawValue] as? String
  // lifespan is sometimes "unknown" or "infinite", so we can't use an int
  self.averageLifespan = json[SpeciesFields.AverageLifespan.rawValue] as? String
  self.homeworld = json[SpeciesFields.Homeworld.rawValue] as? String
  self.url = json[SpeciesFields.Url.rawValue] as? String

  // ints
  self.averageHeight = json[SpeciesFields.AverageHeight.rawValue] as? Int
}
Parsing JSON Arrays of Strings
The next simplest items to deal with are the arrays:
// People, Films
// these are arrays of strings
self.people = json[SpeciesFields.People.rawValue] as? [String]
self.films = json[SpeciesFields.Films.rawValue] as? [String]
This isn’t too different from parsing the array of results in the wrapper. But here the elements we want to extract are arrays of strings (well, actually, they’re URLs but we’ll store them as strings). We can make sure we got string arrays using as? [String].
Parsing JSON String Lists
Next we have those string lists like eye color. We’d like to parse them into arrays of strings and it’d be nice to be able to keep it concise like this:
// SkinColors, HairColors, EyeColors
if let string = json[SpeciesFields.SkinColors.rawValue] as? String {
  self.skinColors = string.splitStringToArray()
}
if let string = json[SpeciesFields.HairColors.rawValue] as? String {
  self.hairColors = string.splitStringToArray()
}
if let string = json[SpeciesFields.EyeColors.rawValue] as? String {
  self.eyeColors = string.splitStringToArray()
}
But there is no splitStringToArray() function :(
But we can write our own :)
We’ll need to:
- Add a new Swift file named StringArrayConvertible to your project (File -> New -> File… -> Swift File)
- Extend the String class to add the
splitStringToArray()function
That’s it! Unlike Objective-C all of your Swift functions are imported everywhere so as long as the StringArrayConvertible.swift file is in your project you’ll be able to call splitStringToArray() on all of your strings
Here’s the implementation for the String extension:
import Foundation

extension String {
  func splitStringToArray() -> [String] {
    var outputArray = [String]()

    let components = self.components(separatedBy: ",")
    for component in components {
      let trimmedComponent = component.trimmingCharacters(in: CharacterSet.whitespaces)
      outputArray.append(trimmedComponent)
    }

    return outputArray
  }
}
First we tell the compiler to add this function to the String class: extension String {...}. We could have gotten all fancy with a StringArrayConvertible protocol here but since we won’t have any classes except String implementing it we won’t bother. If you found that you needed to be able to convert different classes to array then defining a protocol would be a nice way to keep the code consistent.
Our function doesn’t take any arguments: public func splitStringToArray() and it returns an array of strings: -> [String]. -> is used in Swift to denote the return type for a function. [Whatever] is how we declare an array of Whatevers.
Our function has been written so that it will always return an array (instead of using an optional array) but the array might be empty. Usually I’d use an optional return type if a function could fail (like [Whatever]?) but here we’re calling this function on a string that already exists. So it makes sense to me that if you call it like this:
let emptyString = ""
let chunks = emptyString.splitStringToArray()
Then you would get an array with just “” in the first element. The results always contains at least whatever string you called it on.
Parsing Dates in JSON
Ok, so we’re nearly through our JSON elements. Only the dates are left. Since we’re getting the dates as strings and we want to store them as Date objects, we’ll need a DateFormatter. A DateFormatter can convert strings to Date objects and back.
Our dates look like "2014-12-10T16:44:31.486000Z". To set up a date formatter for those strings we’ll want to specify the string format and set a few parameters to tell the date formatter what kind of date it’s processing:
// create it
let dateFormatter = DateFormatter()
// set the format as a text string
// we might get away with just doing this one line configuration for the date formatter
dateFormatter.dateFormat = "yyyy-MM-dd'T'HH:mm:ss.SZ"
// but we if leave it at that then the user's settings for datetime & locale
// can mess it up. So:
// the 'Z' at the end means it's UTC (aka, Zulu time), so let's tell
dateFormatter.timeZone = TimeZone(abbreviation: "UTC")
// dates coming from an english webserver are generally en_US_POSIX locale
// this would be different if your server spoke Spanish, Chinese, etc
dateFormatter.locale = Locale(identifier: "en_US_POSIX")
Aside: The locale & timeZone are useful for using DateFormatters with dates from servers, which you often can’t guarantee to have the same language, time zone & cultural display of dates as your users. Don’t use this approach when setting up dates to display to users. In that case you should use date & time styles like “.short” so that the user sees their dates & times in the way that makes the most sense to them.
Now we need to apply that date formatter to the created and edited date strings:
class StarWarsSpecies {
  ...

  required init(json: JSON, id: Int?) {
    self.idNumber = id
    ...

    // Dates
    // Created, Edited
    let dateFormatter = self.dateFormatter()
    if let dateString = json[SpeciesFields.Created.rawValue] as? String {
      self.created = dateFormatter.date(from: dateString)
    }
    if let dateString = json[SpeciesFields.Edited.rawValue] as? String {
      self.edited = dateFormatter.date(from: dateString)
    }
  }

  fileprivate func dateFormatter() -> DateFormatter {
    // create it
    let dateFormatter = DateFormatter()
    // set the format as a text string
    // we might get away with just doing this one line configuration for the date formatter
    dateFormatter.dateFormat = "yyyy-MM-dd'T'HH:mm:ss.SZ"
    // but we if leave it at that then the user's settings for datetime & locale
    // can mess it up. So:
    // the 'Z' at the end means it's UTC (aka, Zulu time), so let's tell
    dateFormatter.timeZone = TimeZone(abbreviation: "UTC")
    // dates coming from an english webserver are generally en_US_POSIX locale
    // this would be different if your server spoke Spanish, Chinese, etc
    dateFormatter.locale = Locale(identifier: "en_US_POSIX")
    return dateFormatter
  }
}
Aside: Creating a DateFormatter or changing its properties can be very expensive computationally. This code creates a new DateFormatter for each species being parsed. If I found the app was slow that’s one of the first things I would optimize: having all of the species share a single date formatter.
Phew! That was a lot of words for a little parsing. And if we run the app now it doesn’t even look any different :(
Don’t fret, getting the data to display isn’t all that difficult. Let’s do it by adding a detail view controller so when we tap on the table view row for a species we’ll get a new view showing a bunch of its details.
Adding the SpeciesDetailViewController
Start by adding a new file (File -> New -> File… -> Swift File). Name it SpeciesDetailViewController. We’ll display several of the properties in some text in a UILabel and we’ll need the view controller to know what species it’s displaying. So update the SpeciesDetailViewController with its necessary properties:
import Foundation
import UIKit

class SpeciesDetailViewController: UIViewController {
  @IBOutlet var descriptionLabel: UILabel?
  var species: StarWarsSpecies?
}
Now we’ll set up the transition from the table view to the detail view. If you’re not familiar with Interface Builder, IBOutlets and Segues, you might want to review Apple’s “Start Developing” tutorial first or if you get lost below. I’ve tried to include enough guidance to step you through these steps. Let me know in the comment if it’s too terse or too wordy :)
- Open the Main.storyboard file.
- From the lower right section, add a View Controller (drag it into the main screen)
- Change the class of the View Controller to
SpeciesDetailViewController(choose the 3rd tab in the organizer on the right side of the screen, after selecting the new View Controller you just added)
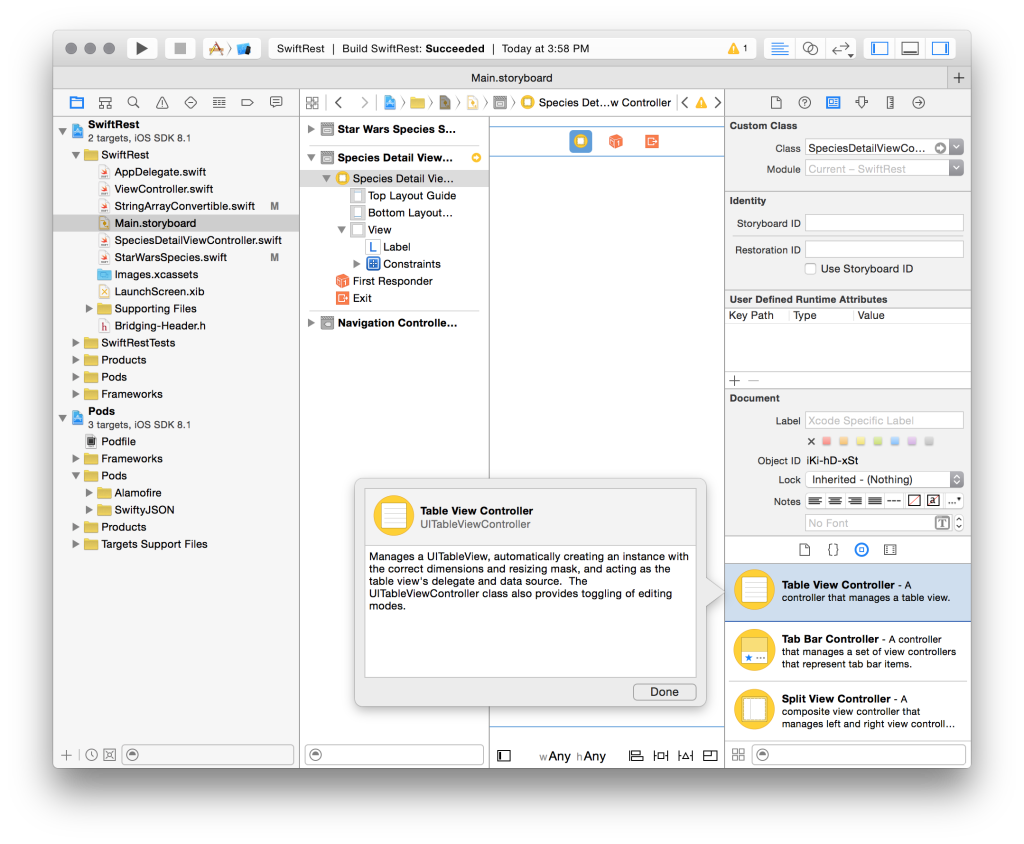
- Pan over to the table view controller. Control-click on the table view cell and drag a connection to the new SpeciesDetailViewController. You should get a little blue line with dots at the end connecting the two views.
- In the little segue pop-up, choose Selection Segue: Show (e.g., Push) for the segue type cuz we’re showing details when they select a cell
And we’ll need that label in the detail view:
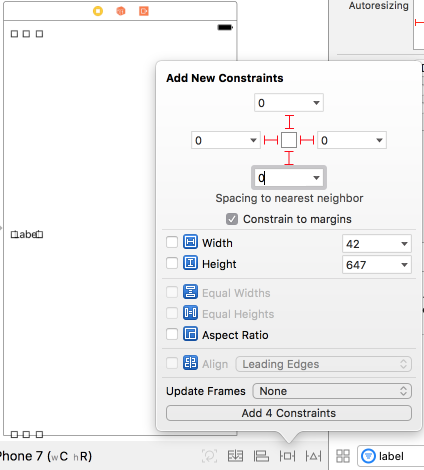
- From the lower right section, add a UILabel by dragging it into the SpeciesDetailViewController’s view
- Use Auto Layout to make the label nearly as wide & tall as the view: Select the label then click the “Add New Constraints” button at the bottom right of the screen
- Add 4 constraints that make the label line up with the view’s margins (0 distance and constraint to margins on)
- While you have the label selected, in the top of the right panel, choose the connection organizer (last tab, the icon is an arrow in a circle)
- In the connection organizer, click on the circle next to “New Referencing Outlet” and drag a connection to the SpeciesDetailViewController
- In the popup that appears, choose to connect to the descriptionLabel (which is the IBOutlet we put in the code earlier)
And it’d be really handy if we had a navigation bar so our users could go back from the detail view to the list of species. So, select the table view controller (not the new detail view) then from the Edit menu choose Embed in -> Navigation Controller.
Aside: if you’re doing this for a new project you can just create a master-detail project and Xcode will set most of this stuff up for you.
Passing Data in a Segue
If we run the project now we can select a species and the app will show us a blank screen. We need to tell the SpeciesDetailViewController what species it’s displaying data for and set up what text to display in the descriptionLabel.
To tell the SpeciesDetailViewController which species was selected in the tableview we’ll add some code to our main view (ViewController.swift):
class ViewController: UIViewController, UITableViewDataSource, UITableViewDelegate {
  ...

  // MARK: Segue
  override func prepare(for segue: UIStoryboardSegue, sender: Any?) {
    super.prepare(for: segue, sender: sender)

    if let speciesDetailVC = segue.destination as? SpeciesDetailViewController {
      if let indexPath = self.tableview?.indexPathForSelectedRow {
        speciesDetailVC.species = self.species?[indexPath.row]
      }
    }
  }
}
The prepare(for segue: function is called when the transition (aka, “segue”) from the table view to the detail view starts. That segue is what we dragged from the table view cell to our new view.
In prepare(for segue: we need to:
- Get the view controller we’re going to:
if let speciesDetailVC = segue.destination as? SpeciesDetailViewController - Figure out which row they tapped:
let indexPath = self.tableview?.indexPathForSelectedRow. That’s the currently selected row. The indexPath gives us the row & section for it, in case we had a tableview with multiple section - Get the species that corresponds to that row:
self.species?[indexPath.row] - And pass that species to the destination view controller:
speciesDetailVC.species = self.species?[indexPath.row]
Displaying the Species Details
Now our SpeciesDetailViewController will have a species when it starts up. So we can use the data from the species to fill in the label. We’ll build up a nice long string that depends on what data we have. It’ll take a few techniques to build up that string:
We can use aString += "more text" to build up the string as we go, like:
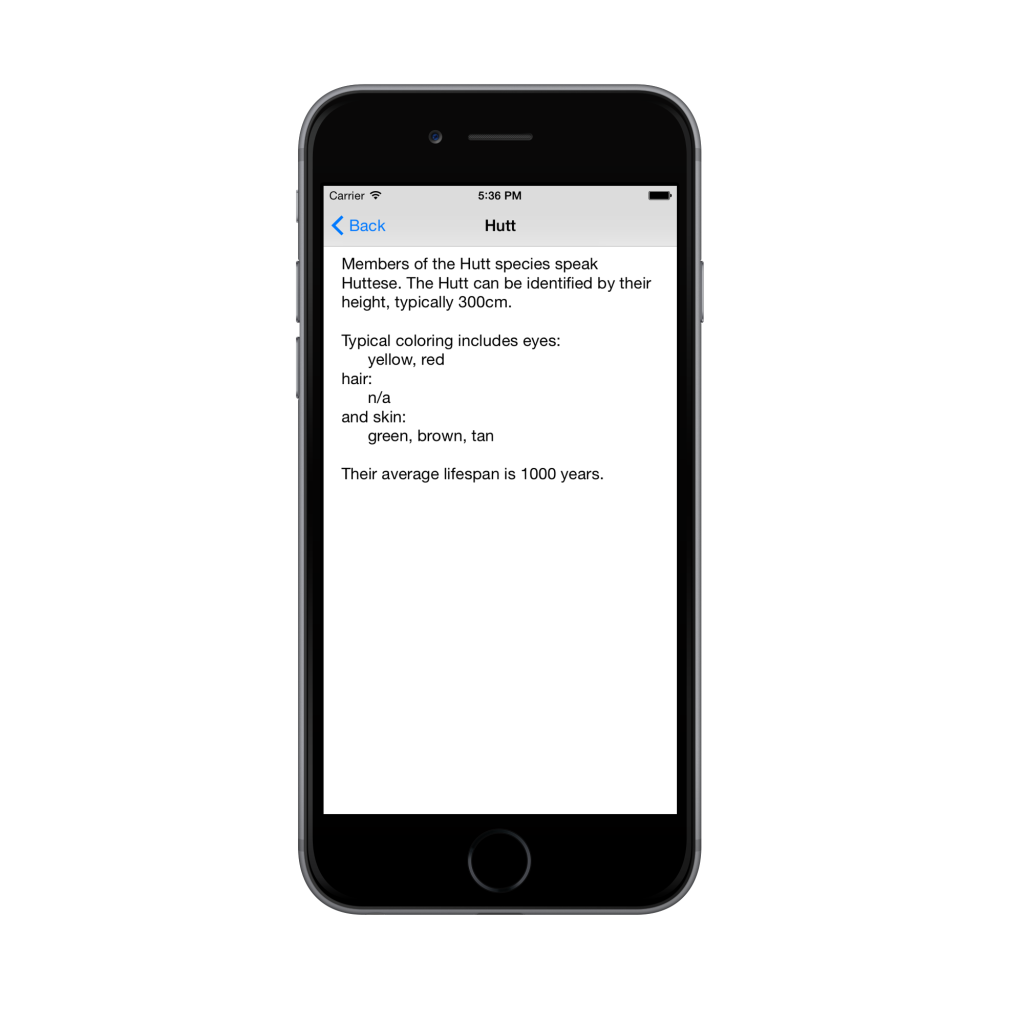
descriptionText += "Members of the \(name) species speak \(language). "
Other strings can be included in the text like \(stringName).
So "Members of the \(name) species speak \(language). " gives us something like "Members of the Ewok species speak Ewokese. "
To handle the arrays of strings:
var eyeColors:String?
if let colors = self.species?.eyeColors {
  eyeColors = colors.joined(separator: ", ")
}
which gives us something like “red or yellow or green” by joining the elements in the array and inserting " or " between them.
Adding \n inserts a newline and \t adds a tab.
To check if the lifespan is a number like 100 or a string like “indefinite” we can try to convert it to an int and see if we get anything:
if let lifespan = self.species?.averageLifespan {
  // some species have numeric lifespans (like 100) and some have lifespans like "indefinite", so we handle both by adding " years" to the numeric ones
  descriptionText += "\n\nTheir average lifespan is \(lifespan)"
  if let _ = Int(lifespan) {
    descriptionText += " years"
  }
}

descriptionText += "."
Putting all of that string manipulation together, in the SpeciesDetailViewController:
class SpeciesDetailViewController: UIViewController {
  @IBOutlet var descriptionLabel: UILabel?
  var species:StarWarsSpecies?
  ...

    override func viewWillAppear(_ animated: Bool) {
    super.viewWillAppear(animated)
    // fill in the label with text from the species
    displaySpeciesDetails()
  }

  func displaySpeciesDetails() {
    // just in case we don't have a species due to some error, empty out the label's contents
    self.descriptionLabel?.text = ""
    if self.species == nil {
      return
    }

    var descriptionText = ""

    if let name = self.species?.name {
      self.title = name // set the title for the navigation bar
      // if they have a language, add that first
      if let language = self.species!.language {
        descriptionText += "Members of the \(name) species speak \(language). "
      }

      // Add their average height if we have one
      if let height = self.species?.averageHeight {
        descriptionText += "The \(name) can be identified by their height, typically \(height)cm."
      }

      var eyeColors:String?
      if let colors = self.species?.eyeColors {
        eyeColors = colors.joined(separator: ", ")
      }
      var skinColors:String?
      if let colors = self.species?.skinColors {
        skinColors = colors.joined(separator: ", ")
      }
      var hairColors:String?
      if let colors = self.species?.hairColors {
        hairColors = colors.joined(separator: ", ")
      }

      if let eyeColors = eyeColors,
        let skinColors = skinColors,
        let hairColors = hairColors {
        // if any of the colors, tack 'em on
        descriptionText += "\n\nTypical coloring includes eyes:\n\t\(eyeColors)\nhair:\n\t\(hairColors)\nand skin:\n\t\(skinColors)"
      }
    }

    if let lifespan = self.species?.averageLifespan {
      // some species have numeric lifespans (like 100) and some have lifespans like "indefinite", so we handle both by adding " years" to the numeric ones
      descriptionText += "\n\nTheir average lifespan is \(lifespan)"
      if let _ = Int(lifespan) {
        descriptionText += " years"
      }
    }

    descriptionText += "."

    self.descriptionLabel?.text = descriptionText
  }
}
And That’s All :)
Run it and check out all your deets.
P.S. If you got tired of typing grab the code from GitHub (Swift3.0_Detail_View branch).
In future posts we’ll keep building out on this app, making that custom view pretty with a fancy pants custom Star Wars font, pull to refresh & custom table view cells for style. To get those articles sent directly to your inbox, sign up below.