 Grok Swift
February 22, 2015 - Updated: December 06, 2016 - Swift 3.0
Aside: This tutorial doesn’t explain the basics of adding a UITableView to a Swift app. If you’re fuzzy on the details of implementing a UITableView, take a read through Apple’s docs or a a nice summary on StackOverflow. This tutorial is all about tying a table view to an API call returning an array of items.
The UITableView is the bread & butter of tons of iOS apps. Combined with access to a web service, it’s the core of apps from Mailbox to Twitter/Tweetbot to Facebook, even Apple’s Notes & App Store apps.
We’re going to create a table view that displays species from the Star Wars movies :) The lovely SWAPI.co lists tons of data about Star Wars so we’ll be hooking in to that. We’ll need to make a GET API call, parse the returned JSON, and set up a table view to display it. Since this API returns paginated data we’ll also implement loading the next page of results as the user scrolls down.

This tutorial has been updated to use Swift 3.0, Xcode 8, iOS 10, and Alamofire 4.1.
While you can have Xcode prefill all the methods you need by adding a UITableViewController to your project, I inevitably end up actually wanting a UIViewController with a UITableView inside of it. This approach is more flexible, for example it makes it easier to add views that don’t scroll above or below the table view. If you’re using storyboards it’s a pain to change out a UITableViewController for a UIViewController later so I these days I just start with a UIViewController by default.
If you don’t want to type along, grab the code from GitHub (Swift3.0_REST_Tableview branch).
Getting Set Up
To get started:
- Create a single view iOS app project in Xcode
- Add Alamofire 4.1 using CocoaPods
- Add a table view to the main view in the storyboard
- Add a prototype cell to the table view, use the cell ID “Cell” (or remember what you used & use it in the cell creation code in the table view data source)
- Change the cell’s style to Right Detail
- Hook up the main view controller as the data source & delegate for the table view in the storyboard
If you’re not sure what your Podfile should look like, here it is:
# Uncomment the next line to define a global platform for your project
# platform :ios, '9.0'

target 'SwiftRest' do
  # Comment the next line if you're not using Swift and don't want to use dynamic frameworks
  use_frameworks!

  # Pods for SwiftRest
  pod 'Alamofire', '~> 4.1.0'
end
Make sure to swap in the name of your target instead of SwiftRest.
If you’re not familiar with CocoaPods, read our brief intro.
Setting Up the Table View
Now, we can get into the code. In ViewController.swift we need to implement the UITableView data source & delegate protocols. First add the protocols to the class declaration:
class ViewController: UIViewController, UITableViewDataSource, UITableViewDelegate {
Then add the boilerplate for the methods that we need to implement:
func tableView(_ tableView: UITableView, numberOfRowsInSection section: Int) -> Int {
  return 0
}

func tableView(_ tableView: UITableView, cellForRowAt indexPath: IndexPath) -> UITableViewCell {
  let cell = tableView.dequeueReusableCell(withIdentifier: "Cell", for: indexPath)
  return cell
}

func tableView(_ tableView: UITableView, didSelectRowAt indexPath: IndexPath) {

}
You should now be able to run the app without errors, though it’ll just display an empty table view. The contents of the first two of these functions drive what gets shown in the table view (which is why they’re part of the table view data source protocol). The third function handles taps on the rows. We aren’t going to use it today but we will eventually so let’s just leave it in place. Note that it’s a table view delegate function, not a data source function. That’s because it handles interactions and/or styling of the table view, not the actual data displayed.
Species Class
Similar to the Todos class in our strongly typed API call project, we need a class to represent the species. From the API docs on species each species looks like this in JSON:
{
  "average_height": "2.1",
  "average_lifespan": "400",
  "classification": "Mammal",
  "created": "2014-12-10T16:44:31.486000Z",
  "designation": "Sentient",
  "edited": "2014-12-10T16:44:31.486000Z",
  "eye_colors": "blue, green, yellow, brown, golden, red",
  "hair_colors": "black, brown",
  "homeworld": "http://swapi.co/api/planets/14/",
  "language": "Shyriiwook",
  "name": "Wookie",
  "people": [
      "http://swapi.co/api/people/13/"
  ],
  "films": [
      "http://swapi.co/api/films/1/",
      "http://swapi.co/api/films/2/"
  ],
  "skin_colors": "gray",
  "url": "http://swapi.co/api/species/3/"
}
And the response to a GET call to https://swapi.co/api/species/ looks like this (with the elements with results as above):
{
  "count": 37,
  "next": "http://swapi.co/api/species/?page=2",
  "previous": null,
  "results": [<Species>]
}
So we’ll need 2 classes: StarWarsSpecies and SpeciesWrapper (for the array of species plus the count, next, previous fields).
SpeciesWrapper is pretty simple:
class SpeciesWrapper {
  var species: [StarWarsSpecies]?
  var count: Int?
  var next: String?
  var previous: String?
}
There’s a little more to the StarWarsSpecies. To avoid typing strings in when we’re parsing the JSON, let’s use an enum of the field names:
enum SpeciesFields: String {
  case Name = "name"
  case Classification = "classification"
  case Designation = "designation"
  case AverageHeight = "average_height"
  case SkinColors = "skin_colors"
  case HairColors = "hair_colors"
  case EyeColors = "eye_colors"
  case AverageLifespan = "average_lifespan"
  case Homeworld = "homeworld"
  case Language = "language"
  case People = "people"
  case Films = "films"
  case Created = "created"
  case Edited = "edited"
  case Url = "url"
}
We’ll start the class with the properties and an initializer:
class StarWarsSpecies {
  var idNumber: Int?
  var name: String?
  var classification: String?
  var designation: String?
  var averageHeight: Int?
  var skinColors: [String]?
  var hairColors: [String]?
  var eyeColors: [String]?
  var averageLifespan: String?
  var homeworld: String?
  var language: String?
  var people: [String]?
  var films: [String]?
  var created: Date?
  var edited: Date?
  var url: String?

  required init(json: [String: Any]) {
    self.name = json[SpeciesFields.Name.rawValue] as? String
    self.classification = json[SpeciesFields.Classification.rawValue] as? String
    self.designation = json[SpeciesFields.Designation.rawValue] as? String
    self.averageHeight = json[SpeciesFields.AverageHeight.rawValue] as? Int
    // TODO: more fields!
  }
}
For today we’ll only use the few fields shown in the initializer (actually, not even all of those). In a future post we’ll come back and finish building out the initializer to handle all of the fields in the JSON.
And we need the API endpoint to access:
class StarWarsSpecies {
  ...
  // MARK: Endpoints
  class func endpointForSpecies() -> String {
    return "https://swapi.co/api/species/"
  }
}
You’ll need to use https, not http in iOS 9 to avoid issues with App Transport Security.
Our SpeciesWrapper and StarWarsSpecies classes will represent the API response as strongly typed Swift objects. Now we need to figure out how to fill them up with the data from the API call.
Getting & Processing the API Response
Last time we worked out how to make API calls and transform the response into Swift objects. We’ll be doing the same thing now to fetch the Star Wars Species. We used a convenience function that took the DataResponse from the Alamofire call and converted it into the object we expected (or an error):
private class func todoFromResponse(response: DataResponse<Any>) -> Result<Todo> {
  // ...
}
We’ll be using a similar function today, so we can add it as a placeholder in StarWarsSpecies:
class StarWarsSpecies {
  // ...

  private class func speciesArrayFromResponse(_ response: DataResponse<Any>) -> Result<SpeciesWrapper> {
    // TODO: implement
  }
}
Then we need to add the function to make the call and pass the response to that convenience function:
class StarWarsSpecies {
  ...
  fileprivate class func getSpeciesAtPath(_ path: String, completionHandler: @escaping (Result<SpeciesWrapper>) -> Void) {
    // make sure it's HTTPS because sometimes the API gives us HTTP URLs
    guard var urlComponents = URLComponents(string: path) else {
      let error = BackendError.urlError(reason: "Tried to load an invalid URL")
      completionHandler(.failure(error))
      return
    }
    urlComponents.scheme = "https"
    guard let url = try? urlComponents.asURL() else {
      let error = BackendError.urlError(reason: "Tried to load an invalid URL")
      completionHandler(.failure(error))
      return
    }
    let _ = Alamofire.request(url)
      .responseJSON { response in
        if let error = response.result.error {
          completionHandler(.failure(error))
          return
        }
        let speciesWrapperResult = StarWarsSpecies.speciesArrayFromResponse(response)
        completionHandler(speciesWrapperResult)
    }
  }

  class func getSpecies(_ completionHandler: @escaping (Result<SpeciesWrapper>) -> Void) {
    getSpeciesAtPath(StarWarsSpecies.endpointForSpecies(), completionHandler: completionHandler)
  }

  class func getMoreSpecies(_ wrapper: SpeciesWrapper?, completionHandler: @escaping (Result<SpeciesWrapper>) -> Void) {
    guard let nextURL = wrapper?.next else {
      let error = BackendError.objectSerialization(reason: "Did not get wrapper for more species")
      completionHandler(.failure(error))
      return
    }
    getSpeciesAtPath(nextURL, completionHandler: completionHandler)
  }
}
To keep the details of the internals of SpeciesWrapper within the SpeciesWrapper and StarWarsSpecies classes, we’ve defined one private function that gets us the SpeciesWrapper from a given URL string. Then to actually access that function we’ve defined 2 convenience functions: getSpecies load the initial species (from GET .../species/) and getMoreSpecies takes a SpeciesWrapper and loads the species at the URL in the next property.
Within getSpeciesAtPath we’re making sure that the URL string starts with https:// instead of http://. That’s because swapi.co supports HTTPS but the URLs it returns in the JSON have http:// instead. This tweak is needed because of App Transport Security in iOS 9.
To be able to use those errors, we need to add the definitions. I’ve just added it to the top of that file:
import Foundation
import Alamofire

enum BackendError: Error {
  case urlError(reason: String)
  case objectSerialization(reason: String)
}
// ...
Now we need to actually implement speciesArrayFromResponse to actually create StarWarsSpecies objects from the API response:
private class func speciesArrayFromResponse(_ response: DataResponse<Any>) -> Result<SpeciesWrapper> {
  guard response.result.error == nil else {
    // got an error in getting the data, need to handle it
    print(response.result.error!)
    return .failure(response.result.error!)
  }

  // make sure we got JSON and it's a dictionary
  guard let json = response.result.value as? [String: Any] else {
    print("didn't get species object as JSON from API")
    return .failure(BackendError.objectSerialization(reason:
      "Did not get JSON dictionary in response"))
  }

  let wrapper:SpeciesWrapper = SpeciesWrapper()
  wrapper.next = json["next"] as? String
  wrapper.previous = json["previous"] as? String
  wrapper.count = json["count"] as? Int

  var allSpecies: [StarWarsSpecies] = []
  if let results = json["results"] as? [[String: Any]] {
    for jsonSpecies in results {
      let species = StarWarsSpecies(json: jsonSpecies)
      allSpecies.append(species)
    }
  }
  wrapper.species = allSpecies
  return .success(wrapper)
}
The heavy lifting is done by this code (well, really by Alamofire but we’ve got to take credit for something). First it checks for any errors that Alamofire returned:
guard response.result.error == nil else {
  // got an error in getting the data, need to handle it
  print(response.result.error!)
  return .failure(response.result.error!)
}
Then it makes sure that we got a dictionary in the JSON like we expect:
guard let json = response.result.value as? [String: Any] else {
  //print("didn't get species object as JSON from API")
  return .failure(BackendError.objectSerialization(reason:
    "Did not get JSON dictionary in response"))
}
If we got that dictionary, we can start parsing the JSON. First the top-level elements for the wrapper:
let wrapper:SpeciesWrapper = SpeciesWrapper()
wrapper.next = json["next"] as? String
wrapper.previous = json["previous"] as? String
wrapper.count = json["count"] as? Int
Then we dig down to the results element, whose content gets parsed into an array of StarWarsSpecies objects:
var allSpecies: [StarWarsSpecies] = []
if let results = json["results"] as? [[String: Any]] {
  for jsonSpecies in results {
    let species = StarWarsSpecies(json: jsonSpecies)
    allSpecies.append(species)
  }
}
And finally we add those species to the wrapper and return it:
wrapper.species = allSpecies
return .success(wrapper)
Displaying the Species
So now we can grab those species when the app starts up and display them. In ViewController.swift (don’t forget to hook up the IBOutlet in the storyboard so we can refresh the data in the table view):
class ViewController: UIViewController, UITableViewDataSource, UITableViewDelegate {
  var species: [StarWarsSpecies]?
  var speciesWrapper: SpeciesWrapper? // holds the last wrapper that we've loaded
  var isLoadingSpecies = false

  @IBOutlet weak var tableview: UITableView?

  // MARK: Lifecycle

  override func viewDidLoad() {
    super.viewDidLoad()
    // place table view below status bar, cuz I think it's prettier that way
    self.tableview?.contentInset = UIEdgeInsetsMake(20.0, 0.0, 0.0, 0.0);

    self.loadFirstSpecies()
  }
  ...
}
So right after our view shows up on the screen (and we adjust the table view so it starts below the status bar), we’ll call a function to fetch the species. To handle loading the species & displaying them we need a few vars:
species: To hold all of the species we’ve loaded (which might be from multiple API calls due to pagination)speciesWrapper: To access the next field if we need to load more species and to access the count field to see whether we need to load more speciesisLoadingSpecies: Since our API wrappers are asynchronous, we want to make sure we don’t fire off a second request to load more species after we’ve already done so. There are more sophisticated ways of handling this requirement but a simple boolean value works for our simple example.
So how do we actually handle loading the species & populating those vars?
func loadFirstSpecies() {
  isLoadingSpecies = true
  StarWarsSpecies.getSpecies { result in
    if let error = result.error {
      // TODO: improved error handling
      self.isLoadingSpecies = false
      let alert = UIAlertController(title: "Error", message: "Could not load first species :( \(error.localizedDescription)", preferredStyle: UIAlertControllerStyle.alert)
      alert.addAction(UIAlertAction(title: "Click", style: UIAlertActionStyle.default, handler: nil))
      self.present(alert, animated: true, completion: nil)
    }
    let speciesWrapper = result.value
    self.addSpeciesFromWrapper(speciesWrapper)
    self.isLoadingSpecies = false
    self.tableview?.reloadData()
  }
}

func loadMoreSpecies() {
  self.isLoadingSpecies = true
  if let species = self.species,
    let wrapper = self.speciesWrapper,
    let totalSpeciesCount = wrapper.count,
    species.count < totalSpeciesCount {
    // there are more species out there!
    StarWarsSpecies.getMoreSpecies(speciesWrapper) { result in
      if let error = result.error {
        self.isLoadingSpecies = false
        let alert = UIAlertController(title: "Error", message: "Could not load more species :( \(error.localizedDescription)", preferredStyle: UIAlertControllerStyle.alert)
        alert.addAction(UIAlertAction(title: "Click", style: UIAlertActionStyle.default, handler: nil))
        self.present(alert, animated: true, completion: nil)
      }
      let moreWrapper = result.value
      self.addSpeciesFromWrapper(moreWrapper)
      self.isLoadingSpecies = false
      self.tableview?.reloadData()
    }
  }
}

func addSpeciesFromWrapper(_ wrapper: SpeciesWrapper?) {
  self.speciesWrapper = wrapper
  if self.species == nil {
    self.species = self.speciesWrapper?.species
  } else if self.speciesWrapper != nil && self.speciesWrapper!.species != nil {
    self.species = self.species! + self.speciesWrapper!.species!
  }
}
To load the first species we fire off the asynchronous API request (after settings our boolean flag to show that we’re loading species). Then when we get the response we:
- Check for an error and display it if we have one
- If there’s no error, save the wrapper locally, append the species to the species array by calling
addSpeciesFromWrapper(which is empty up to then) and refresh the table view so it’ll display them. - Turn off the
isLoadingSpeciesflag - Reload the table view so that the new rows display
Loading more species is pretty similar, except we first make sure that we actually have a wrapper and there are more species that we haven’t loaded yet.
Customizing the Table View
So we now have the data in the app but no one can see it… The last thing we need to do is actually have the table view data source create the table view cells and fill in the posts’ data. So change the table view data source boilerplate to display the contents of the array of posts:
func tableView(_ tableView: UITableView, numberOfRowsInSection section: Int) -> Int {
  if self.species == nil {
    return 0
  }
  return self.species!.count
}

func tableView(_ tableView: UITableView, cellForRowAt indexPath: IndexPath) -> UITableViewCell {
  let cell = tableView.dequeueReusableCell(withIdentifier: "Cell", for: indexPath)

  if let species = species, species.count >= indexPath.row {
    let speciesToShow = species[indexPath.row]
    cell.textLabel?.text = speciesToShow.name
    cell.detailTextLabel?.text = speciesToShow.classification

    // See if we need to load more species
    let rowsToLoadFromBottom = 5;
    let rowsLoaded = species.count
    if (!self.isLoadingSpecies && (indexPath.row >= (rowsLoaded - rowsToLoadFromBottom))) {
      let totalRows = self.speciesWrapper?.count ?? 0
      let remainingSpeciesToLoad = totalRows - rowsLoaded;
      if (remainingSpeciesToLoad > 0) {
        self.loadMoreSpecies()
      }
    }
  }

  return cell
}

func tableView(_ tableView: UITableView, didSelectRowAt indexPath: IndexPath) {

}
Loading more species if necessary happens in the tableView cellForRowAt indexPath function. After getting a cell and filling in the data to display, we check whether we’re close to the bottom of the list of cells. This works because cellForRowAtIndexPath gets called when a cell is coming on to the screen. So as we scroll the cells further down the screen will get created (actually, it’ll grab cells from higher up and reuse them, so if you ever find the wrong data in your cells when you scroll your error is probably in this function). Anyway, as we scroll down the indexPath in successive calls to cellForRowAtIndexPath gets bigger so we can use it to judge when they’ve scrolled down so far that we need to load more species.
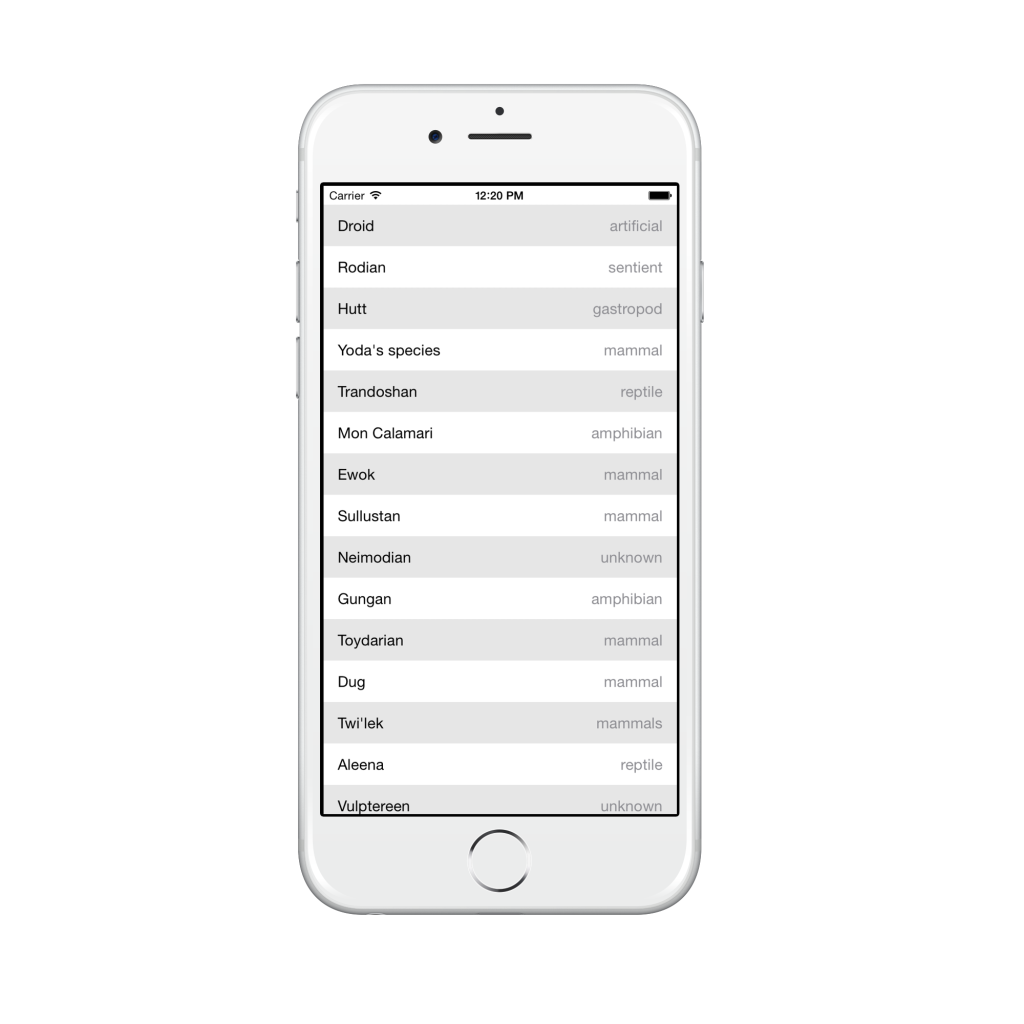
Save & run. You should find that the app launches then the table view pops up, then it fills in with list of species and their classifications. As you scroll down, it’ll load more species. The delay in loading more isn’t great but that can be adjusted with rowsToLoadFromBottom. Increasing rowsToLoadFromBottom will improve the smoothness of scrolling but with 37 entries it’s not really worth optimizing.
If you want to style it up just a little bit you can add the following code to your ViewController.swift to set up the rows to have alternating background colors:
func tableView(_ tableView: UITableView, willDisplay cell: UITableViewCell, forRowAt indexPath: IndexPath) {
  if indexPath.row % 2 == 0 {
    cell.backgroundColor = UIColor(red: 0.9, green: 0.9, blue: 0.9, alpha: 1.0) // very light gray
  } else {
    cell.backgroundColor = UIColor.white
  }
}
And That’s All :)
In future posts we’ll keep building out on this app, adding custom views for individual species that show all of their details (including parsing the rest of the fields in the JSON) & custom table view cells for style. We’ll also add a search bar and pull to refresh. To get those articles sent directly to your inbox, sign up below.
P.S. If you got tired of typing grab the code from GitHub (Swift3.0_REST_Tableview branch).