December 26, 2015
A background image behind a table view can make your app look nicely customized without a ton of effort. There are a few pitfalls to make it look just right so let’s walk through how to add a background image to a UITableView. We’ll tweak the transparency so the table view cells look ok, stop extra empty cells from hiding the background image, and center & scale the image so it doesn’t get stretched.
Here’s what the demo will look like when we’re done:

This tutorial was written using Swift 2.0 and Xcode 7.1.
I’ll be using a UITableViewController as a demo but this tutorial will work with any UITableView. If you want a project to play with, open Xcode and create a new Swift Master-Detail project. That’ll give you a MasterViewController that’s a UITableViewController so you can work with its table view. That demo project is convenient because you can easily add and remove table view cells to see how your background looks with more or fewer cells over it.
Adding the Background Image
We’ll start by adding the background image then we’ll see how we can improve our demo app to make it look nicer. To add a background image to a table view we can use the backgroundView property. You’ll need to drag an image into your project (just drop it in to the list of files on the left) then use it to create a UIImage.:
let backgroundImage = UIImage(named: "GrokSwiftLogo500.png")
The filename for the image is case sensitive on iOS devices but not in the simulator. So make sure you’ve used the right case or you’ll be wondering why it doesn’t show up sometimes.
Then we can use that image to create a UIImageView and set the view as the background view for the table view:
let imageView = UIImageView(image: backgroundImage)
self.tableView.backgroundView = imageView
Let’s put that code in viewWillAppear then save and run that to see what happens (the rest of this function is generated by Xcode for Master-Detail projects):
override func viewWillAppear(animated: Bool) {
  self.clearsSelectionOnViewWillAppear = self.splitViewController!.collapsed
  super.viewWillAppear(animated)

  // Add a background view to the table view
  let backgroundImage = UIImage(named: "GrokSwiftLogo500.png")
  let imageView = UIImageView(image: backgroundImage)
  self.tableView.backgroundView = imageView
}
If you’re using the Master-Detail app, tap the + button a few times to add some cells. You should end up with something that looks like this:

There are a few problems with that, at least to my eyes:
- The background image is hidden by the table view cells
- The background image is stretched
Also, when you scroll up and down you’ll see separators between extra cells at the end of the table view.
Let’s deal with those 3 issues.
Hide Empty Cells
To get rid of the empty extra cells at the end of the table view, all we need to do is to set a table view footer. If we don’t want to put any content in it then we can just use an empty view:
// no lines where there aren't cells
tableView.tableFooterView = UIView(frame: CGRectZero)
Adding that to the end of viewWillAppear will cure that problem.
Fitting the Image
To tell the image that it shouldn’t stretch but should resize itself so the whole image can be seen:
// center and scale background image
imageView.contentMode = .ScaleAspectFit
That will fit the whole image so it doesn’t get cut off:

If you’d rather fill the whole space with the image:
// center and scale background image
imageView.contentMode = .ScaleAspectFill

Add whichever of those bits of code that you want to the end of viewWillAppear. Both will maintain your image’s aspect ratio so it doesn’t get stretched so you just need to choose between fitting the image to the view (.ScaleAspectFit) or filling the view with the image (.ScaleAspectFill).
Adjusting the Background Color
Depending on your image you might need to adjust the background color to make it easier to see your image. If you’re using a PNG image with transparency then this will change the color of the transparent areas. If your image isn’t partly transparent and you’re using imageView.contentMode = .ScaleAspectFit, then use this to make the background color blend in with the image so the edges aren’t obvious:
// Set the background color to match better
tableView.backgroundColor = .lightGrayColor()

You can put that code at the end of viewWillAppear.
Making UITableView Cells Transparent
Next we’ll deal with the table view cells hiding the backgound image. It might seem reasonable work in tableView: cellForRowAtIndexPath: to do that but that function can get pretty cluttered. Instead there’s a UITableViewDelegate function just for making tweaks to the cell’s appearance just before it gets displayed. It’s called tableView: willDisplayCell: forRowAtIndexPath:.
If we want to make the table view cells totally transparent we can just set their background color to clear:
override func tableView(tableView: UITableView, willDisplayCell cell: UITableViewCell, forRowAtIndexPath indexPath: NSIndexPath) {
  cell.backgroundColor = .clearColor()
}
Then all of the contents of the cell will stay opaque but we’ll be able to see the background image:

But it’s pretty hard to see the text on top of the image. It would look better if the cells has a bit of translucent background color. To do that, set the cell or the content view’s background color to a partly transparent color like 50 percent white:
override func tableView(tableView: UITableView, willDisplayCell cell: UITableViewCell, forRowAtIndexPath indexPath: NSIndexPath) {
  cell.backgroundColor = UIColor(white: 1, alpha: 0.5)
}

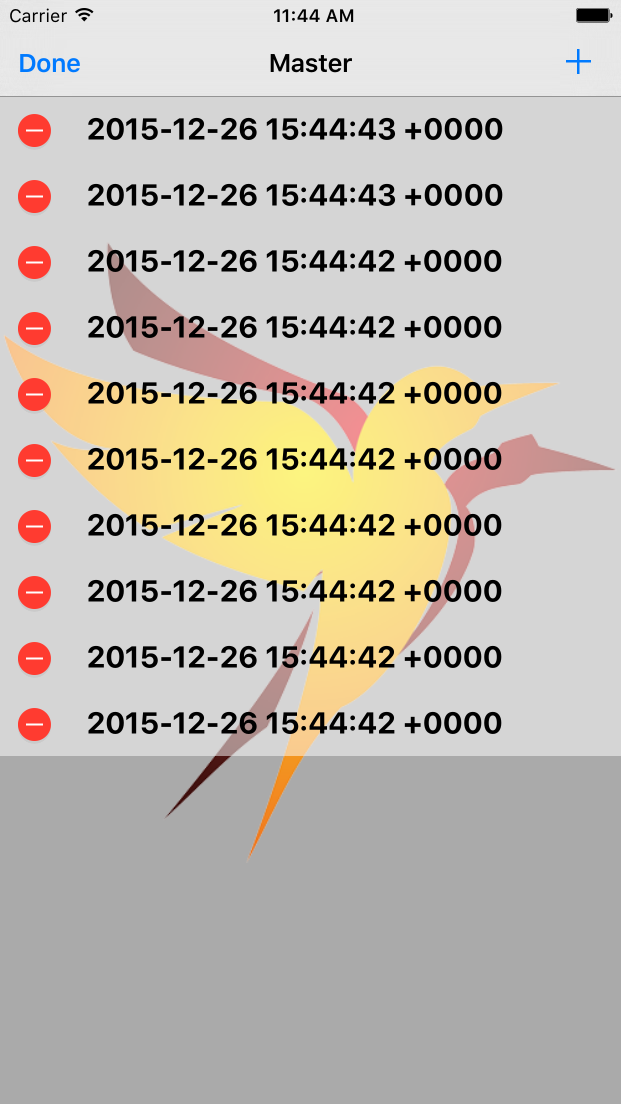
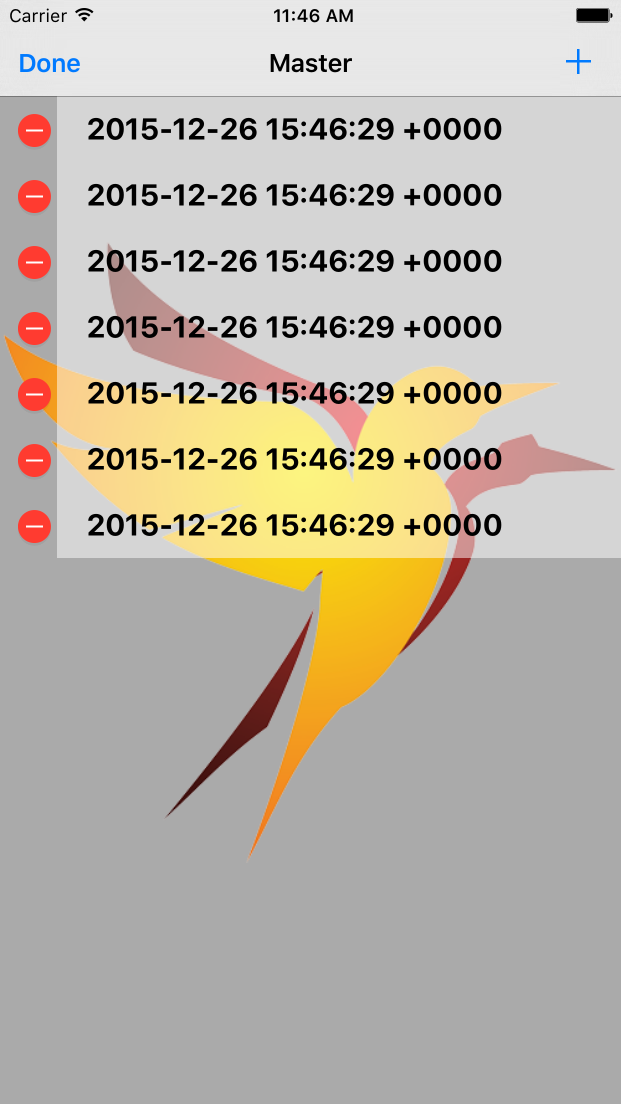
It might seem like you can achieve the same thing by setting the cell’s background to clear then the content view’s background to translucent. But if you use edit mode (or other features that involve shifting the cell over, like the much loved swipes in Mailbox), then you’ll get sections where the background color is missing.
Here’s edit mode using cell.backgroundColor = UIColor(white: 1, alpha: 0.5):

And using cell.backgroundColor = .clearColor and cell.contentView.backgroundColor = UIColor(white: 1, alpha: 0.5):

Unless you want that effect for some reason (or aren’t dealing with transparency), you’ll want to use cell.backgroundColor.
Adding a Blur Effect
If you just want to a generic blur as a background for your table view that’s easy to add. At the end of viewWillAppear we can add a blur effect view over the image like so:
let blurEffect = UIBlurEffect(style: UIBlurEffectStyle.Light)
let blurView = UIVisualEffectView(effect: blurEffect)
blurView.frame = imageView.bounds
imageView.addSubview(blurView)

Depending on your image, it might look better to use UIBlurEffect(style: UIBlurEffectStyle.ExtraLight) or UIBlurEffect(style: UIBlurEffectStyle.Dark).
And That’s All
Save and run to test it out. Play with the transparency level or colors to see what looks good for your app.
Here’s the final example code on GitHub.
If you’d like more Swift tutorials on topics like this one, sign up below to get them sent directly to your inbox.
 Grok Swift