 Grok Swift
December 04, 2015
A few weeks ago we set up a project that included downloading some pretty big files. Since those files take a while to download, users might think that nothing is happening. It’d be a good thing to make sure users know what’s going on by showing the download progress. Here’s how to add a progress bar when you’re downloading files with Alamofire.download.
This tutorial was written using Swift 2.0, Xcode 7.0, and Alamofire v3.1.2.
Here’s the code from the previous tutorial that will be our starting point on GitHub - tagged htmlAndDownloads.
To give users a better idea of what’s going on in this demo app let’s make 2 improvements:
- Show whether we’ve already downloaded a file
- Show a progress bar while a file is downloading
Our Project
The app we created previously has a single view controller. It contains a table view with a list of PDF files that contain nautical charts. That list comes from parsing HTML from a web page.
When you tap on a cell in the table view, the PDF gets downloaded (unless it’s already saved on your device). Then it gets opened. Not too complicated.
Here’s our code to download a chart:
func downloadChart(chart: Chart, completionHandler: (Double?, NSError?) -> Void) {
  guard isChartDownloaded(chart) == false else {
    completionHandler(1.0, nil) // already have it
    return
  }

  let destination = Alamofire.Request.suggestedDownloadDestination(directory: .DocumentDirectory, domain: .UserDomainMask)
  Alamofire.download(.GET, chart.url, destination: destination)
    .progress { bytesRead, totalBytesRead, totalBytesExpectedToRead in
      print(totalBytesRead)
      dispatch_async(dispatch_get_main_queue()) {
        let progress = Double(totalBytesRead) / Double(totalBytesExpectedToRead)
        completionHandler(progress, nil)
      }
    }
    .responseString { response in
      print(response.result.error)
      completionHandler(nil, response.result.error)
    }
}
First we check that the chart isn’t already downloaded. Then we set where we want the file to be saved:
let destination = Alamofire.Request.suggestedDownloadDestination(directory: .DocumentDirectory, domain: .UserDomainMask)
And use Alamofire to download the file from the URL that we parsed from the HTML to that location:
Alamofire.download(.GET, chart.url, destination: destination)
We have 2 functions chained on to that request. One to print out any errors:
.responseString { response in
  print(response.result.error)
  completionHandler(nil, response.result.error)
}
And one to use the completion handler to report the progress and completion of the download:
.progress { bytesRead, totalBytesRead, totalBytesExpectedToRead in
  print(totalBytesRead)
  dispatch_async(dispatch_get_main_queue()) {
    let progress = Double(totalBytesRead) / Double(totalBytesExpectedToRead)
    completionHandler(progress, nil)
  }
}
So as we download the file, the function that called this function will get regular reports of how much of the file has been downloaded:
completionHandler(progress, nil)
progress is a value between 0 and 1 indicating how much of the file has been downloaded.
Last time we only checked if the file was completely downloaded and opened it when it was done:
override func tableView(tableView: UITableView, didSelectRowAtIndexPath indexPath: NSIndexPath) {
  if let chart = dataController.charts?[indexPath.row] {
    dataController.downloadChart(chart) { progress, error in
      // TODO: handle error
      print(progress)
      print(error)
      if (progress == 1.0) {
        // TODO: show open in dialog
      }
    }
  }
}
All we did with the progress value was print it to the log. That’s the value we’ll use to show the progress in the progress bar.
Custom Table View Cells
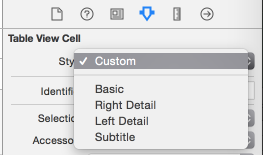
We’ll want to stick a progress view in each table view cell so we’ll need to use a custom cell. Switch over to your main storyboard and select the prototype cell in the storyboard.
Change its type to custom:
Place a UILabel and a UIProgressView in your cell and position them however you want
Set the progress level to 0:
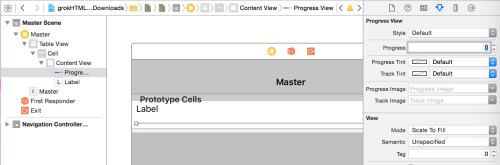
And set the progress bar to hidden. We’ll only show it while the file is downloading:

Next we need to be able to access the label and progress view from code. So create a new file for our custom UITableViewCell subclass called ChartCell.swift with IBOutlets for those two components:
import Foundation
import UIKit

class ChartCell: UITableViewCell {
  @IBOutlet weak var titleLabel: UILabel!
  @IBOutlet weak var progressBar: UIProgressView!
}
Pop back over to the storyboard and set the class for the custom cell:
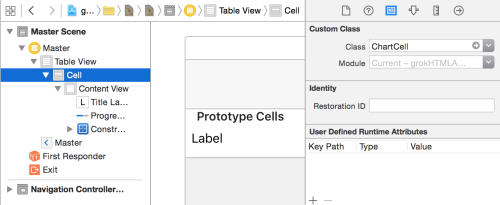
Now we can write code that works with that title label and progress view.
Did We Already Download It?
The first of our 2 tweaks that we’ll make is to show the user if the file has already been downloaded. We already have a function to check if the file is already downloaded in DataController:
func isChartDownloaded(chart: Chart) -> Bool {
  if let path = chart.urlInDocumentsDirectory?.path {
    let fileManager = NSFileManager.defaultManager()
    return fileManager.fileExistsAtPath(path)
  }
  return false
}
The chart object knows where it should be stored (chart.urlInDocumentsDirectory) so that function just needs to check whether the file already exists.
Now let’s change our table view cells so that they indicate whether the file is downloaded. Table view cells have a built-in accessory view near their right edge that can show one of a few icons. We’ll show a checkmark there if the file has been downloaded:
if self.dataController.isChartDownloaded(chart) {
  // show disclosure indicator if we already have it
  chartCell.accessoryType = .Checkmark
}
We’ll do that in tableView: cellForRowAtIndexPath::
override func tableView(tableView: UITableView, cellForRowAtIndexPath indexPath: NSIndexPath) -> UITableViewCell {
  let cell = tableView.dequeueReusableCellWithIdentifier("Cell", forIndexPath: indexPath)

  if let chartCell = cell as? ChartCell {
    if let chart = dataController.charts?[indexPath.row] {
      chartCell.titleLabel.text = "\(chart.number): \(chart.title)"

      if self.dataController.isChartDownloaded(chart) {
        // show disclosure indicator if we already have it
        chartCell.accessoryType = .Checkmark
      }
    }
  }

  return cell
}
Save & run. Tap on a cell and wait for the file to download. Hmm, the checkmark isn’t showing up. But it does if we scroll up and down so that row gets redrawn.
That’s because tableView: cellForRowAtIndexPath: doesn’t get called right after the download is done. We’ll need to tell the cell to start showing the checkmark then.
The downloading happens in tableView: didSelectRowAtIndexPath:. We’ll have to add to the part that gets executed when the download is done (progress == 1.0):
override func tableView(tableView: UITableView, didSelectRowAtIndexPath indexPath: NSIndexPath) {
  if let chart = dataController.charts?[indexPath.row] {
    dataController.downloadChart(chart) { progress, error in
      // TODO: handle error
      print(progress)
      print(error)
      if (progress == 1.0) {
        if let filename = chart.filename {
          let paths = NSSearchPathForDirectoriesInDomains(.DocumentDirectory, .UserDomainMask, true)
          let docs = paths[0]
          let pathURL = NSURL(fileURLWithPath: docs, isDirectory: true)
          let fileURL = NSURL(fileURLWithPath: filename, isDirectory: false, relativeToURL: pathURL)

          self.docController = UIDocumentInteractionController(URL: fileURL)
          self.docController?.delegate = self
          if let cell = self.tableView.cellForRowAtIndexPath(indexPath) {
            self.docController?.presentOptionsMenuFromRect(cell.frame, inView: self.tableView, animated: true)
            // show checkmark
            if let chartCell = cell as? ChartCell {
              chartCell.accessoryType = .Checkmark
              chartCell.setNeedsDisplay()
            }
          }
        }
      }
    }
  }
}
Here’s what was added:
if let chartCell = cell as? ChartCell {
  chartCell.accessoryType = .Checkmark
  chartCell.setNeedsDisplay()
}
Unlike tableView: cellForRowAtIndexPath: this function doesn’t normally tell the cell to redraw itself. So we need to do that explicitly using setNeedsDisplay().
Why do we still need the checkmark code in tableView: cellForRowAtIndexPath:? Because we’re telling the table view to reuse its cells:
let cell = tableView.dequeueReusableCellWithIdentifier("Cell", forIndexPath: indexPath)
When you scroll a cell off of the screen it will get reused for a cell that’s revealed by your scrolling. So we need to set the checkmark each time the cell gets shown as well as when the download is completed.
Save & run. Notice anything funny? As you scroll up and down more checkmarks appear. That’s because they’re getting set for those table view cells then the cells are getting reused without any code to remove the checkmarks.
Often you’ll find code to reset the view of a table view cell in tableView: cellForRowAtIndexPath: but there’s a better place for it. UITableViewCell has a prepareForReuse function that you can override:
class ChartCell: UITableViewCell {
  @IBOutlet weak var titleLabel: UILabel!
  @IBOutlet weak var progressBar: UIProgressView!

  override func prepareForReuse() {
    super.prepareForReuse()
    // reset view for cell before it gets reused
  }
}
So let’s use that to remove the checkmark. While we’re at it we’ll reset the cell just as we set it up in the storyboard. Blank out the title label and hide & reset the progress bar:
override func prepareForReuse() {
  super.prepareForReuse()
  // reset view for cell before it gets reused
  titleLabel.text = ""
  progressBar.progress = 0
  progressBar.hidden = true
  accessoryType = .None
}
Now save & run. The checkmarks should only show up where they belong, even after scrolling up and down.
Showing Progress
The second feature we wanted to show was the progress bar while a file is downloading. We already set up our downloadChart function to download a file. Its completion handler reports the progress as a number between 0 and 1 so we can use that for our progress value. Here’s the current completion handler:
override func tableView(tableView: UITableView, didSelectRowAtIndexPath indexPath: NSIndexPath) {
  if let chart = dataController.charts?[indexPath.row] {
    dataController.downloadChart(chart) { progress, error in
      // TODO: handle error
      print(progress)
      print(error)
      if (progress == 1.0) {
        // show checkmark and open file
      }
    }
  }
}
We need to do 2 things:
- Show the progress bar when the file starts downloading
- Set the progress bar’s value so they can see the progress
We’ll do both of those things only when we haven’t finished downloading the file, when the progress value is less than 1:
override func tableView(tableView: UITableView, didSelectRowAtIndexPath indexPath: NSIndexPath) {
  if let chart = dataController.charts?[indexPath.row] {
    dataController.downloadChart(chart) { progress, error in
      // TODO: handle error
      print(progress)
      print(error)
      if (progress < 1.0) {
        // ...
      }
      if (progress == 1.0) {
        // show checkmark and open file
      }
    }
  }
}
And we’ll need to get the cell that was tapped so we can access the progress bar:
if (progress < 1.0) {
  if let cell = self.tableView.cellForRowAtIndexPath(indexPath), chartCell = cell as? ChartCell {
    // do stuff with cell
  }
}
UIProgressView makes those things easy, first we’ll add the progress value to the if-let statement so it’s not an optional:
if (progress < 1.0) {
  if let cell = self.tableView.cellForRowAtIndexPath(indexPath), chartCell = cell as? ChartCell, progressValue = progress {
    // do stuff with cell
  }
}
Then we can show the progress bar and set the value inside of that statement. Since we’re making changes to the cell’s appearance we need to call setNeedsDisplay() again:
if (progress < 1.0) {
  if let cell = self.tableView.cellForRowAtIndexPath(indexPath), chartCell = cell as? ChartCell, progressValue = progress {
    chartCell.progressBar.hidden = false
    chartCell.progressBar.progress = Float(progressValue)
    chartCell.setNeedsDisplay()
  }
}
Since progressValue is a Double we need to cast it to a Float, which is what the progress bar expects.
And That’s All
Save and run to test it out. You should be able to see the list of charts with checkmarks:
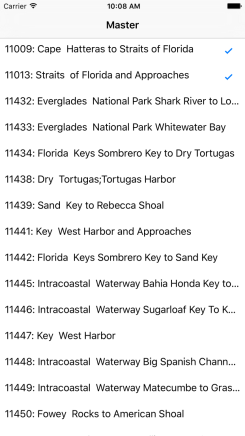
When you tap on one it should download, showing the progress bar, (unless you’ve already downloaded it) then display the “Open In” dialog.
Here’s the final code on GitHub - tagged progress.
If you’d like more Swift tutorials on topics like this one, sign up below to get them sent directly to your inbox.