June 12, 2015
As of iOS 8 your app can add a section to the Notification Center that users see when they swipe down from the top of the screen. This view is called a Today extension or just a widget.
Today we’ll create a simple app with a today widget. It’ll just tell you the last time you ran the main app. Since extensions aren’t part of the app they’re associated with that’ll require:
- a main app that saves the time it’s run
- an extension app that displays it
- and a data store that’s shared between the two apps
This tutorial has been updated for Swift 2.0 and Xcode 7.
Here’s what it’ll do when we’re done:
In order to set up the data sharing between the extension and the main app you’ll need an Apple Developer account. At least I think you do, I couldn’t get it to work without one but if anyone manages to please let me know and I’ll update this tutorial.
How Extensions Work
A widget is a separate program from your main app even though it can’t exist without the main app. So we’ll need two targets in our project: our main app and our extension app. Behind the scenes the extension gets compiled to a binary that gets included in the main app’s bundle so they can be submitted to the App Store as a single entity.
Since the extension and the main app are separate programs, communication between them isn’t trivial. We’ll use the simplest way: adding both apps to an App Group and using a set of shared NSUserDefaults to pass the timestamp from the main app to the extension. Since different processes are sharing the same data you need to be careful not to corrupt your data. In our example this isn’t a concern because only the main app will write the data. The extension will only read it. If you need to have both apps write to the data, Atomic Bird’s has a great blog post explaining approaches and potential issues. Apple recommends using Core Data, SQLite, or Posix locks.
To share more data or to reuse code between your main app and your extension, see Apple’s documentation in the App Extension Programming Guide (which you should probably read anyway). You can use an embedded framework to share code, use a database in the shared container, or use NSURLSession with the shared container so that both the main app and the extension can access downloaded data.
Main App Project Setup
Create a new single view project in Xcode. Usually I like Interface Builder for visualizing UI elements and their connections but this app is so simple that we’ll just set up the UI in code:
import UIKit

class ClockViewController: UIViewController {
  var timeLabel: UILabel?

  var timer: NSTimer?
  let INTERVAL_SECONDS = 0.2

  var dateFormatter = NSDateFormatter()

  override func viewDidLoad() {
    super.viewDidLoad()

    // set up date formatter since it's expensive to keep creating them
    self.dateFormatter.dateStyle = NSDateFormatterStyle.LongStyle
    self.dateFormatter.timeStyle = NSDateFormatterStyle.LongStyle

    // create and add label to display time
    timeLabel = UILabel(frame: self.view.frame)
    updateTimeLabel(nil) // to initialize the time displayed
    // style the label a little: multiple lines, center, large text
    timeLabel?.numberOfLines = 0 // allow it to wrap on to multiple lines if needed
    timeLabel?.textAlignment = .Center
    timeLabel?.font = UIFont.systemFontOfSize(28.0)
    self.view.addSubview(timeLabel!)

    // Timer will tick ever 1/5 of a second to tell the label to update the display time
    timer = NSTimer.scheduledTimerWithTimeInterval(INTERVAL_SECONDS, target: self, selector: "updateTimeLabel:", userInfo: nil, repeats: true)
  }

  func updateTimeLabel(timer: NSTimer!) {
    if let label = timeLabel {
      // get the current time
      let now = NSDate.new()
      // convert time to a string for display
      let dateString = dateFormatter.stringFromDate(now)
      label.text = dateString
    }
  }
}
The app is pretty simple:
- When the view is shown, we create a label, a timer, and a date formatter
- The date formatter gets reused because they’re expensive to set up (really in an app this size it doesn’t matter, I’m just in the habit of always reusing them)
- The label is used to display the current time
- The timer fires off every 1/5 of a second to update the time displayed in the label. That update happens in the
updateTimeLabel:function.
See, nothing too fancy there. You should build & run now just to make sure it works. It’s always easiest to debug frequently instead of writing a ton of code then trying to figure out why it doesn’t work.
You should build & run now just to make sure it works. It’s always easiest to debug frequently instead of writing a ton of code then trying to figure out why it doesn’t work. We’ll worry about saving the timestamp to share it with the extension later. First we need to add the extension.
Adding our Extension
To add a Today Extension in Xcode, go to the File menu. Select New -> Target. Then choose Application Extension -> Today Extension. Make sure the langage is set to Swift and the Project and Embed in Application match your existing project (which they should but Xcode can be sneaky). When you’re asked, activate it.
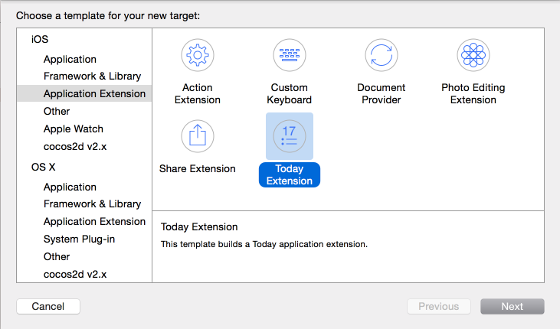
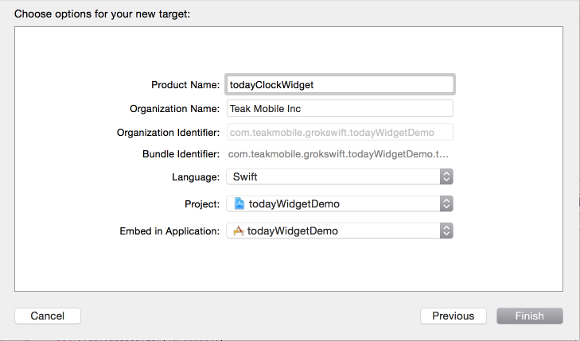
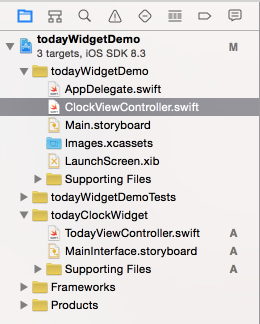
You’ll see that Xcode has added some new files: a view controller and storyboard to provide the interface for our widget.
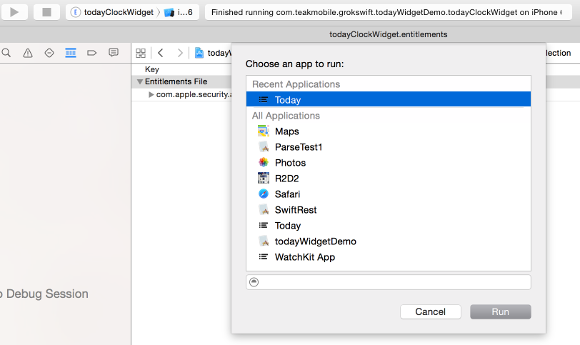
In the top left corner of Xcode, select your widget target (it has a blue circle with an E next to it). Build & run. You’ll get a dialog to choose the app to run, “Today”:
If you run into an error about layout constraints (it’s a bug in the code generated by Xcode, totally not your fault), then open MainInterface.storyboard in the todayClockWidget files. Select the main view and reset it’s constraints. Do the same for the label:
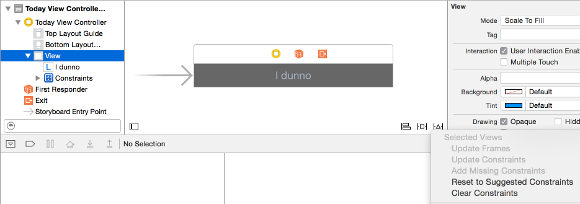
Now you should be able to run the widget though it doesn’t do anything exciting.
Extension User Interface
The easiest thing to customize is the title displayed above our extension in the notification center. It comes from the extension’s info.plist:
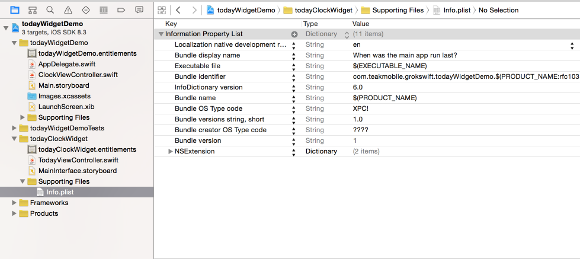
Then we need to be able to change the text within the extension. Xcode already generated a label so just add an IBOutlet to the code:
class TodayViewController: UIViewController, NCWidgetProviding {
  @IBOutlet var widgetTimeLabel: UILabel?
  ...
}
Then hook up the IBOutlet in Interface Builder (in the todayClockWidget’s MainInterface.storyboard:

So now our TodayViewController for the today extension looks like this:
import UIKit
import NotificationCenter

class TodayViewController: UIViewController, NCWidgetProviding {
  @IBOutlet var widgetTimeLabel: UILabel?

  override func viewDidLoad() {
    super.viewDidLoad()
    // Do any additional setup after loading the view from its nib.
  }

  override func didReceiveMemoryWarning() {
    super.didReceiveMemoryWarning()
    // Dispose of any resources that can be recreated.
  }

  func widgetPerformUpdateWithCompletionHandler(completionHandler: ((NCUpdateResult) -> Void)!) {
    // Perform any setup necessary in order to update the view.

    // If an error is encountered, use NCUpdateResult.Failed
    // If there's no update required, use NCUpdateResult.NoData
    // If there's an update, use NCUpdateResult.NewData
    completionHandler(NCUpdateResult.NewData)
  }
}
We need to fill out the widgetPerformUpdateWithCompletionHandler to display the timestamp from the main app in the extension’s label. But first we need to get the main app to put the data somewhere that the extension can access it.
Sharing Main App Data with a Today Extension
As mentioned earlier, there are a few ways to share data between the main app and the extension. The simplest is to use NSUserDefaults and it’ll work for what we’re doing today.
Sorry, you’ve got a few minutes of iTunesConnect & the Provisioning Portal. They’re necessary evils of iOS app development :( These steps are where you’ll need an iOS Developer account.
To share data between the main app and the today extension:
Set up the app group
We need to have an app group existing to coordinate the data sharing between the apps. App groups are used to control which apps can share data. To set up an App Group, first we need to set up the App IDs in the developer portal. Head on over to the Apple Developer Provisioning Profile and login with your developer account. Under Identifiers, select App IDs. Then add both of the IDs (the main app and the extension) You can find the app IDs in Xcode listed under Bundle Identifier for each target:

The IDs should be set up as Explicit App IDs with the App Groups entitlement enabled:
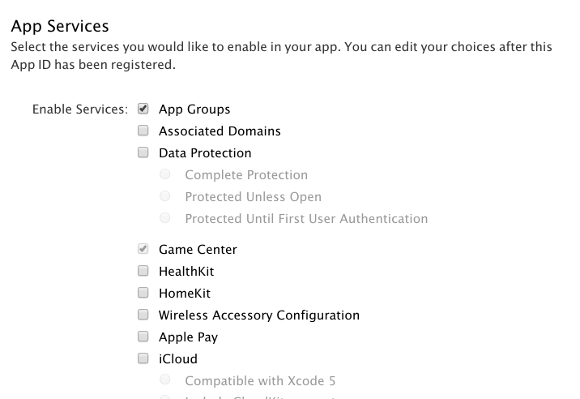
Then back in Xcode we need to set up the App Group. Select the main app target and navigate to Capabilities. Scroll down to the App Groups setting and turn it on. When prompted enter an ID for the app group:
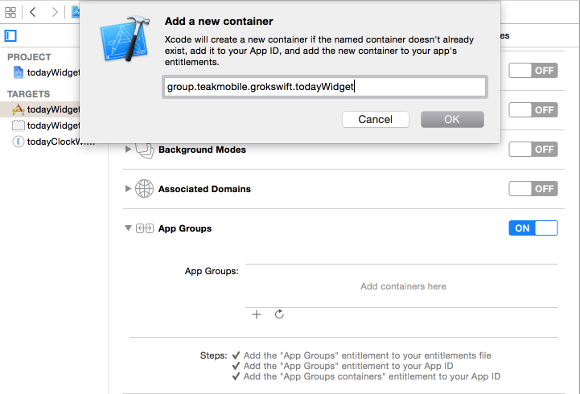
Once Xcode has done it’s thing (which includes adding the App ID to the provisioning portal for you which is why you had to add the app IDs there first), switch to the Today Extension target. Select the same App Group for it. When you’re done both of the targets should have App Group Capabilities that look like this:
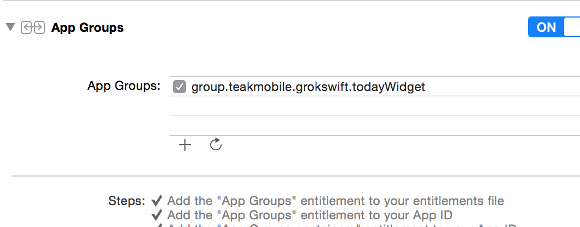
Registering the App Group
While it seems like that should be enough, I had to do one more step to get my App Group to work. Otherwise I got an error about entitlements and an error that didn’t seem correct:
warning: Capabilities that require entitlements from "todayWidgetDemo/todayWidgetDemo.entitlements" may not function in the Simulator because none of the valid provisioning profiles allowed the specified entitlements: com.apple.security.application-groups.

error: Embedded binary's bundle identifier is not prefixed with the parent app's bundle identifier.
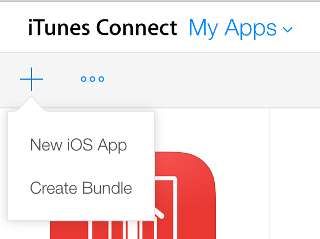
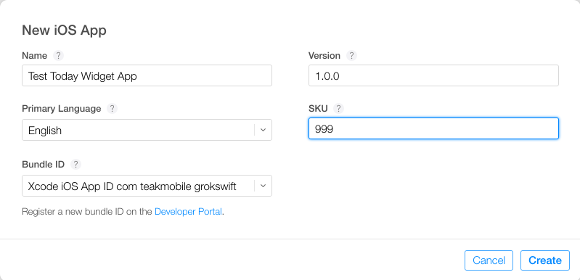
To get rid of the error, log in to iTunesConnect. Go to the My Apps section. Add both the main app and the extension as new apps. You can name the apps whatever you want but they must be unique in the App Store and you won’t be able to reuse them for different apps later. Make sure you have the correct bundle ID (it should autopopulate from the Provisioning Portal):

Save the Time String in the Main App
Now that we’ve pumped up Apple’s website hits for the day, we can use the App Group in code to generate a shared data store. In the main app we’ll add a few lines to save the timestamp when the timer fires off:
func updateTimeLabel(timer: NSTimer!)
{
    if let label = timeLabel
    {
      // get the current time
      let now = NSDate.new()
      // convert time to a string for display
      let dateString = dateFormatter.stringFromDate(now)
      label.text = dateString
      // set the dateString in the shared data store
      let defaults = NSUserDefaults(suiteName: "group.teakmobile.grokswift.todayWidget")
      defaults?.setObject(dateString, forKey: "timeString")
      // tell the defaults to write to disk now
      defaults?.synchronize()
    }
}
After the code to set the text on the label, we get the NSUserDefault for the suite (aka App Group):
let defaults = NSUserDefaults(suiteName: "group.teakmobile.grokswift.todayWidget")
Then we save the string showing the time:
defaults?.setObject(dateString, forKey: "timeString")Then we tell the data store to write itself to disk right now, instead of waiting until it’s convenient (doing this all the time could be a performance issue but it’s fine here):
defaults?.synchronize()
If we saved the NSDate instead of the string we would have to format it in the extension as well. That would be handy if we wanted to have different date formats.
Display the Time String in the Extension
In the Today Extension we need to implement the widgetPerformUpdateWithCompletionHandler so that the label gets populated:
func widgetPerformUpdateWithCompletionHandler(completionHandler: ((NCUpdateResult) -> Void)!)
{
    // Perform any setup necessary in order to update the view.
    widgetTimeLabel?.text = "Still not sure"
    if let label = widgetTimeLabel
    {
      let defaults = NSUserDefaults(suiteName: "group.teakmobile.grokswift.todayWidget")
      if let timeString:String = defaults?.objectForKey("timeString") as? String
      {
        label.text = "You last ran the main app at: " + timeString
      }
    }

    // If an error is encountered, use NCUpdateResult.Failed
    // If there's no update required, use NCUpdateResult.NoData
    // If there's an update, use NCUpdateResult.NewData
    completionHandler(NCUpdateResult.NewData)
  }
Breaking that down:
To start, we set the label to display “Still not sure” if we don’t have a time saved (like if the extension is run before you’ve ever run the app):
widgetTimeLabel?.text = "Still not sure"
Then we’ll try to grab the label and the time string, setting the label text if we can:
if let label = widgetTimeLabel
{
  let defaults = NSUserDefaults(suiteName: "group.teakmobile.grokswift.todayWidget")
  if let timeString:String = defaults?.objectForKey("timeString") as? String
  {
    widgetTimeLabel?.text = "You last ran the main app at: " + timeString
  }
}
Then we call the completion handler to let the extension know that the user interface should be updated:
completionHandler(NCUpdateResult.NewData)
Build & run (first the main app then the extension). While running the main app you should be able to pull down the notification center and see your widget update. If you close the main app then the widget should continue to show the time that you closed the main app.
And That’s All for our Today Extension
Here’s the finished code on GitHub: TodayWidgetDemo on GitHub or zip.
If you’re looking to do more with your widget than check out these more complex tutorials:
- Networking, TableViews in Extensions and Handling User Input: Displaying an RSS Feed
- API Calls and Embedded Frameworks: Glimsoft Tutorial
If you’d like more Swift tutorials like this one, sign up below to get them sent directly to your inbox. Feel free to come back and visit too, we’re pretty friendly around here but we’ll understand if it’s just easier for us to come to you :)
 Grok Swift