 Grok Swift
February 28, 2016 - Updated: July 26, 2017
Apple gives us a few options for displaying and accepting text in iOS apps. Sometimes it can be confusing whether you should use a UILabel, a UITextField, or a UITextView.
If you’re just displaying static text, use a UILabel. You’ll probably come across recommendations to use a UITextView for special formatting. That used to be a good idea but nowadays UILabel with an attributed string can do almost everything a UITextView can do. Try it with the label first and only switch to a text view if you absolutely need to.
If you’re accepting user input then you’ll have to choose between UITextField and UITextView. If there’s only a single line of text, use a UITextField. For multiple lines of input use a UITextView.
My apps usually have lots of labels, some text fields, and at most a few text views. Today we’ll get better acquainted with some of common requirements that seem to come up almost every time I use a text field:
- Limit the length of text that can be entered
- Only allow certain characters (or don’t allow certain characters)
- Save the text and show it again when they relaunch the app
- Let the user stop editing by tapping the return button on the keyboard
We’ll wrap up by talking about some of the display and behavior options built in to UITextField.
Project Setup
This tutorial was written using Swift 3 and Xcode 8.3.
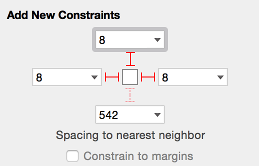
To play with the code below you’ll need a view & view controller with a UITextField. If you just want to play along, create a new single-view project in Xcode. In the main storyboard, drag in UITextField and give it constraints so it stays big enough for the text you want to try out. I used 8 px spacing to the top, right, and left:
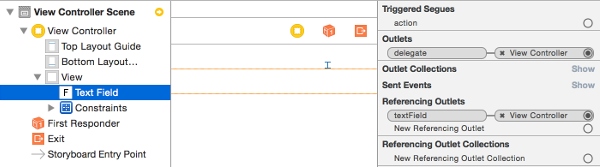
Add an IBOutlet from the UITextField to your view controller and make the view controller the text field’s delegate:
class ViewController: UIViewController, UITextFieldDelegate {
  @IBOutlet weak var textField: UITextField!
  ...
}
Now we’re ready to start implementing our requirements.
Character Number Limit
Only allowing up to a given number of characters is probably the most common requirement I get when working with text fields. You can do it using one of the text field’s delegate methods:
func textField(_ textFieldToChange: UITextField,
  shouldChangeCharactersIn range: NSRange,
  replacementString string: String) -> Bool
This delegate method gets fired off whenever a change to the text field’s text is made. There are 3 parameters:
textFieldToChange: UITextFieldis the text field.shouldChangeCharactersIn range: NSRangeis the range of the text that’s being changed (starting character position and length). We’ll talk about what we can determine from this value in a second.replacementString string: Stringis the text that’s being added. It’ll be empty if they’ve deleted text.
The text can be changed several ways giving different combinations of arguments:
- Adding a character: range empty, replacement string length 1
- Deleting: range of 1 (or more if cutting or selected a few characters), replacement string empty
- Pasting in text (adding multiple characters): range empty (assuming no text was selected), replacement string length 1+
- Clearing the field (with cut or X button): range of 1+ characters, replacement string empty
- Replacing selected text by typing or pasting: range 1+, replacement string 1+
Autocorrect acts like pasting: adding multiple characters and replacing any currently selected text.
One thing we don’t get in this function is the string that would get displayed after the change is made. Since this is a shouldChangeCharactersInRange function it’s happening before the text change gets made. We can’t just check the new string that would exist after the change.
For limiting the number of characters we don’t need to know the final string, just its length. To figure that out we’ll need to length before the change, then we’ll add the length of the text to add (string) and remove the length of the text that’s being replaced (range.length):
// We need to figure out how many characters would be in the string after the change happens
let startingLength = textFieldToChange.text?.characters.count ?? 0
let lengthToAdd = string.characters.count
let lengthToReplace = range.length

let newLength = startingLength + lengthToAdd - lengthToReplace
To get a string’s length in Swift use we count the characters in the string:
let stringLength = myString.characters.countWe’re using the nil coalescing operator (??) so we can use 0 for the length if we can’t get the length of the text. The nil coalescing operator works like this:
let value = valueIfNotNil ?? valueIfNilvalueIfNotNil is assigned to value, unless it’s nil. Then value gets set to valueIfNil. It’s a great way to handle default values, e.g., when you need to display an optional string without crashing:
let displayString = optionalString ?? ""Let’s put the text length calculation in the delegate method. We’ll use a local variable (characterCountLimit) to specify how many characters can be typed in to the field. Then we can return whether the string will be short enough to allow the change:
func textField(_ textFieldToChange: UITextField, shouldChangeCharactersIn range: NSRange, replacementString string: String) -> Bool {
  // limit to 4 characters
  let characterCountLimit = 4

  // We need to figure out how many characters would be in the string after the change happens
  let startingLength = textFieldToChange.text?.characters.count ?? 0
  let lengthToAdd = string.characters.count
  let lengthToReplace = range.length

  let newLength = startingLength + lengthToAdd - lengthToReplace

  return newLength <= characterCountLimit
}
So the text field text change is allowed to happen if the new length will be less than or equal to the number of characters we’re allowing.
Save and run. Test out all of the cases we listed above: normal typing, copy and pasting short & long text, … If you’re using the simulator you can test undo using ctrl-cmd-Z to simulate shaking the device.
Don’t Allow Certain Characters
Filtering the characters that can be typed into the field isn’t too different from our length limit. We still want to approve or disapprove their change to the text before it takes effect. So we’ll use the same delegate method:
func textField(_ textFieldToChange: UITextField, shouldChangeCharactersIn range: NSRange, replacementString string: String) -> Bool {Let’s assume our requirement is to not allow any punctuation to be typed in to the field. We can do that using CharacterSet to check if the new string contains any punctuation.
As the name implies, CharacterSet is a set of characters. There are existing sets for things like whitespace, numeric, alphanumeric, and punctuation. Plus you can create your own sets. Here’s how to get the punctuation one:
let characterSetNotAllowed = CharacterSet.punctuationCharactersIf you need to create a custom character set, the easiest way is to use a string:
let characterSetNotAllowed = CharacterSet(charactersIn: "abcd")To check if a string contains any characters from an CharacterSet use rangeOfCharacter(from:):
let rangeOfCharacter = string.rangeOfCharacter(from: characterSetNotAllowed, options: .caseInsensitive)That will give us the position and length of the first occurrence of the character set. That’s more than adequate for our needs. If there’s a punctuation character we want to return false to not allow the change.
In fact, we don’t even need to access the range, we just need to know whether it exists:
if let _ = string.rangeOfCharacter(from: characterSetNotAllowed, options: .caseInsensitive) {
  return false // they're trying to add not allowed character(s)
} else {
  return true // all characters to add are allowed
}
Sticking that in the text field delegate method:
func textField(_ textFieldToChange: UITextField, shouldChangeCharactersIn range: NSRange, replacementString string: String) -> Bool {
  let characterSetNotAllowed = CharacterSet.punctuationCharacters
  if let _ = string.rangeOfCharacter(from: characterSetNotAllowed, options: .caseInsensitive) {
    return false
  } else {
    return true
  }
}
Save & run to test that out.
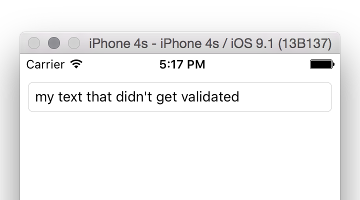
Note that this method only validates user input. If you’re loading text from somewhere else into your text field it won’t get fired. You can test that by adding code to viewWillAppear:
override func viewWillAppear(_ animated: Bool) {
  super.viewWillAppear(animated)

  textField.text = "my text that didn't get validated"
}
Only Allow Certain Characters
Now the opposite: what if they were only allowed to type punctuation into the field? We can use rangeOfCharacterFromSet again. We’ll just need to check the range to make sure it’s all of the new characters (in case they paste in more than one at a time):
func textField(_ textFieldToChange: UITextField, shouldChangeCharactersIn range: NSRange, replacementString string: String) -> Bool {
  let characterSetAllowed = CharacterSet.punctuationCharacters
  if let rangeOfCharactersAllowed = string.rangeOfCharacter(from: characterSetAllowed, options: .caseInsensitive) {
    // make sure it's all of them
    let validCharacterCount = string.characters.distance(from: rangeOfCharactersAllowed.lowerBound, to: rangeOfCharactersAllowed.upperBound)
    return validCharacterCount == string.characters.count
  } else  {
    // none of the characters are from the allowed set
    return false
  }
}
Save & run to make sure that works the way you expect.
Can you find the bug?
Try deleting punctuation that you’ve already typed in to the field. It doesn’t do anything. Oops. That’s why we test all of our test cases, even if the code seems pretty simple and almost identical to something that already works. That’s why we never tell anyone that something will be a quick change that’ll only take 20 minutes. Let’s fix that.
If we’re deleting text then rangeOfCharactersAllowed is nil because the string is empty. So we’ll need to add another case to cover that possibility to allow deleting. When that happens the string is empty. Since we’re only concerned about stopping users from entering certain characters, we can always let them proceed if the string they’re adding is empty:
func textField(_ textFieldToChange: UITextField, shouldChangeCharactersIn range: NSRange, replacementString string: String) -> Bool {
  if string.isEmpty {
    return true
  }

  let characterSetAllowed = CharacterSet.punctuationCharacters
  if let rangeOfCharactersAllowed = string.rangeOfCharacter(from: characterSetAllowed, options: .caseInsensitive) {
    // make sure it's all of them
    let validCharacterCount = string.characters.distance(from: rangeOfCharactersAllowed.lowerBound, to: rangeOfCharactersAllowed.upperBound)
    return validCharacterCount == string.characters.count
  } else  {
    // none of the characters are from the allowed set
    return false
  }
}
Handling Multiple Text Fields
If you have more than one text field that has your view controller as its delegate, you’ll need to differentiate between them in the delegate method. You can do that by comparing the argument to IBOutlets to the text fields:
func textField(_ textFieldToChange: UITextField, shouldChangeCharactersIn range: NSRange, replacementString string: String) -> Bool {
  if textFieldToChange == usernameField {
    // handle username rules
    return shouldChangeUsernameTextField
  } else if textFieldToChange == passwordField {
    // handle password rules
    return shouldChangePasswordTextField
  }
  return true
}
Since the compiler isn’t sure you’ve covered all of the text fields you’ll need to add a default case. We’ve done that after the cases by returning true. If you’ve covered all of your text fields then that line of code will never run.
Stop Editing on Return Key Tap
Normally tapping the return key tries to enter a line break in the text. Since a text field only takes a single line of text that doesn’t do anything.
You can change this behaviour using another UITextFieldDelegate function:
func textFieldShouldReturn(textField: UITextField) -> Bool {
  textField.resignFirstResponder()
  return true
}
When the app asks if the text field should be allowed to return we tell it to stop being the first responder. That’ll dismiss the keyboard and remove the focus from the text field.
Persist Text Between App Runs
If you want to show the same text in multiple runs of the app you’ll need to save it somewhere. Since it’s just a little bit of text we can use UserDefaults.
To save the text we can use defaults.setValue(textField.text, forKey: textFieldContentsKey):
class ViewController: UIViewController, UITextFieldDelegate {
  @IBOutlet weak var textField: UITextField!
  let textFieldContentsKey = "textFieldContents"

  ...

  func saveText() {
    let defaults = UserDefaults.standard
    defaults.set(textField.text, forKey: textFieldContentsKey)
  }
}
Then just before this view gets displayed we can see if we have previously saved text to display using defaults.stringForKey(textFieldContentsKey):
override func viewWillAppear(_ animated: Bool) {
  super.viewWillAppear(animated)

  // load text from UserDefaults
  let defaults = UserDefaults.standard
  if let textFieldContents = defaults.string(forKey: textFieldContentsKey) {
    textField.text = textFieldContents
  } else {
    // focus on the text field if it's empty
    textField.becomeFirstResponder()
  }
}
textField.becomeFirstResponder() gives the text field focus and pops up the keyboard to prompt the user to type some text.
Saving When Done Editing
Then we need to figure out when to save the text. The simplest approach to implement is saving when they finish editing. We can use the UITextFieldDelegate method textFieldDidEndEditing: for that:
func textFieldDidEndEditing(_ textField: UITextField) {
  saveText()
}
But that’s not going to create a great user experience. What if the app gets killed while the text field is still in editing mode? Then we’ll lose their latest changes. We’d be better off saving the text every time they make a change.
This function might be what you want to use if you have to fire off a call to your backend API to save the data. It’s a lot nicer than making them tap a save button, even if it’s not as nice as saving every change they make. We always need to strike a balance between user experience and data usage & performance. Saving to the web app every time they change a character would probably be overkill. It might even make it more difficult to track the current state if it takes longer to save the text than for them to type in another character.
It’d be even nicer to track if changes have been made and make the API call in the background if necessary. But that’s a lot more work. If you have a workplace that’s amenable to prioritizing UX that highly give yourself a mirror high-five then go implement it.
Saving Every Text Change
We could use textField:shouldChangeCharactersInRange:replacementString: to do that but then we’d have to figure out what the string will be after the change is applied so we know what to save. There isn’t a UITextFieldDelegate method that gets fired after a text change.
However, there is a general NSNotification we can register for that will get fired off whenever a UITextField has its text changed. It’s called UITextFieldTextDidChangeNotification. But it’ll get fired off for every UITextField, not just those with the delegate set to the current class. So we need to make sure we check that the text field it’s firing for is the one we care about.
We can register for a notification in viewDidLoad by getting a reference to the existing default notification center. First we’ll get the notification center reference:
let notificationCenter = NotificationCenter.defaultThen register as an observer for the notification:
notificationCenter.addObserver(self,
  selector: "textFieldDidChange:",
  name: UITextFieldTextDidChangeNotification,
  object: nil)
Now when the text field’s text changes the textFieldDidChange: function will get called. So we’d better implement that.
When a notification gets sent it includes a notification object with it. We can get that by casting the sender argument to NSNotification:
let notification = sender as? NotificationNotifications usually have an object attached to them. In this case it should be the UITextField so we’ll grab that object and make sure it’s a UITextField:
let textFieldChanged = notification.object as? UITextField,And we’ll extend that statement one more time to check that the text field is the one we want to deal with:
if let notification = sender as? Notification,
  let textFieldChanged = notification.object as? UITextField,
  textFieldChanged == self.textField
Finally, if that whole statement is true we’ll save the text using our existing function:
if let notification = sender as? Notification,
  let textFieldChanged = notification.object as? UITextField,
  textFieldChanged == self.textField {
  self.saveText()
}
And all together now:
override func viewDidLoad() {
  super.viewDidLoad()

  // Get notified every time the text changes, so we can save it
  let notificationCenter = NotificationCenter.default
  notificationCenter.addObserver(self,
    selector: #selector(textFieldDidChange(_:)),
    name: Notification.Name.UITextFieldTextDidChange,
    object: nil)
}

// ...

func textFieldDidChange(_ sender: Any) {
  if let notification = sender as? Notification,
    let textFieldChanged = notification.object as? UITextField,
    textFieldChanged == self.textField {
    self.saveText()
  }
}
Save & run to make sure that works.
Other Text Field Features
UITextField has a bunch of options that you can find in the documentation. Read the docs before looking for a third party library. It’s surprising how much flexibility is built into some of Apple’s standard UIKit components.
You can have the field clear its text whenever it’s selected using clearsOnBeginEditing (also accessible in Interface Builder: “clear when editing begins”). Or when text is pasted in using clearsOnInsertion.
If you set allowsEditingTextAttributes then pasted-in text will retain any style it has, e.g., bolding & font size. Text styling is a topic for a whole other post.
clearButtonMode specifies when the little x button on the right should show up: always, never, when you’re editing, or when you’re not editing.
If you need to get fancy you can add a little view on the right or left of the text field. According to Apple, “You can use the left overlay view to indicate the intended behavior of the text field. (…) You can use the right overlay view to provide indicate additional features available for the text field.” You can use this to do things like creating a combo box.
Like with text views, UITextInputTraits lets you specify:
- Auto-correct, auto-capitalization, and spell-checking behavior
- Keyboard type: Text, numeric, …
- Keyboard style: Light, dark
- Secure display for entering sensitive data (e.g., password fields)
- Whether the return key is enabled if no text has been entered
- Return key title (but it has to be one of the presets)
And That’s All about UITextField
It’s been a bit of a mixed bag of tips but getting to know your UIKit components intimately is a huge productivity boost. It also comes in super-handy when you’re asked if you can do something in a design meeting. It’s so much nicer not to have to tell them you’ll have to test it and get back to them.
If you’d like more Swift tutorials on topics like this one, sign up below to get them sent directly to your inbox.