 Grok Swift
April 28, 2015
Previously we set up a Swift app that displayed info about Star Wars species from the Star Wars API using Alamofire. Today we’re going to add a search bar to the tableview so we can search through those species. We’ll start with a simple search of species names then add a scope bar to search other fields like the species classification and language.
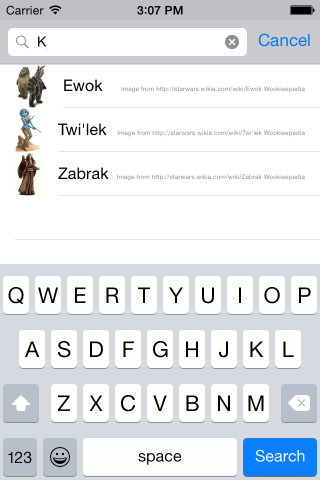
Here’s what it’ll look like when we’re done the name search function:
If you haven’t been following along, you might want to grab the code that’ll be our starting point from GitHub.
Or if you’d rather not type, grab the completed code from this tutorial SwiftREST on GitHub.
Adding the Search Bar and Search Controller
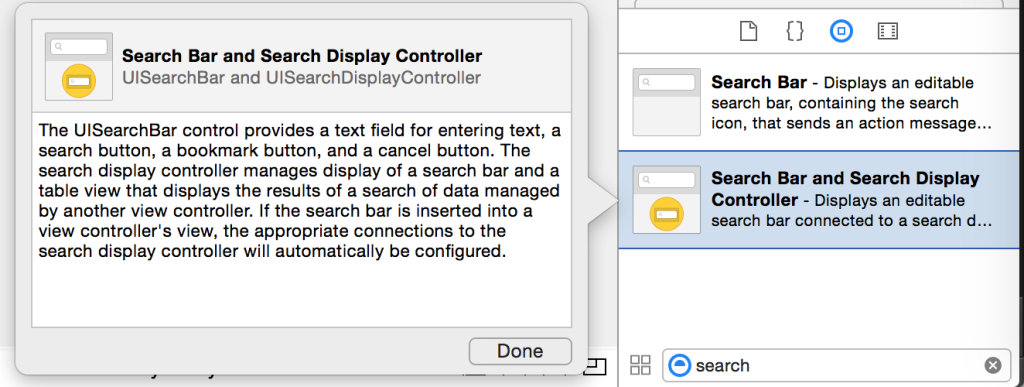
iOS provides some nice pre-made components for adding search bars to tableviews. To add them, open up the main storyboard in Interface Builder. In the lower-right corner, select the Search Bar and Search Display Controller (not just the Search Bar):
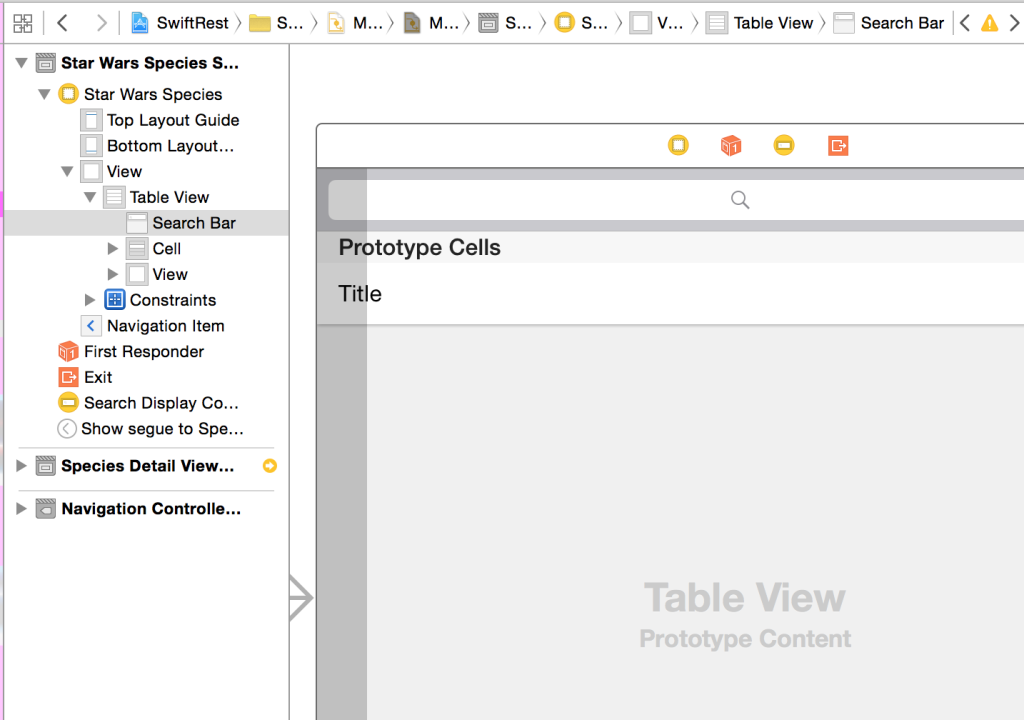
Drag & drop it onto the tableview:
Once it’s added you can click on the Search Bar and Search Display Controller to make sure they’re hooked up properly (this should be done automatically by Xcode). The Search Bar should have it’s delegate set to the tableview. The Search Display Controller should have one reference to the search bar and four (really, four!) to the tableview:
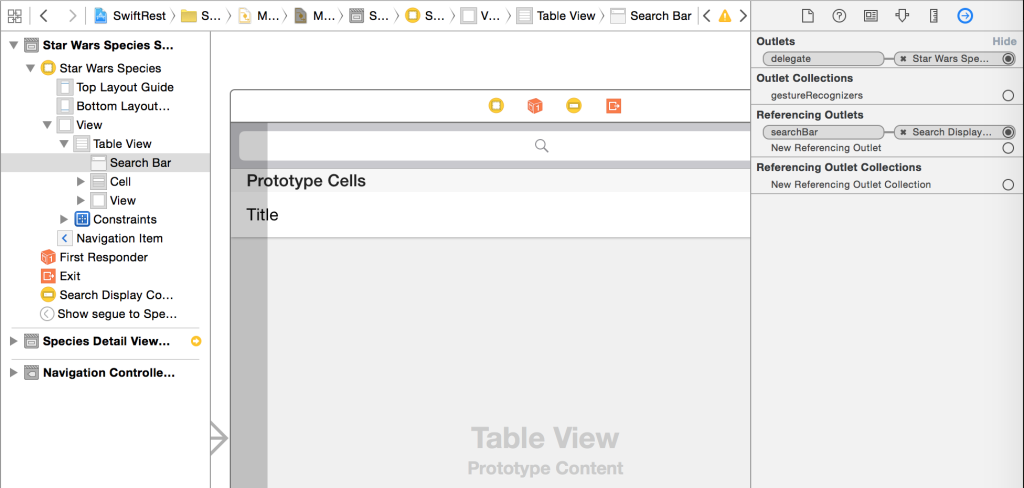
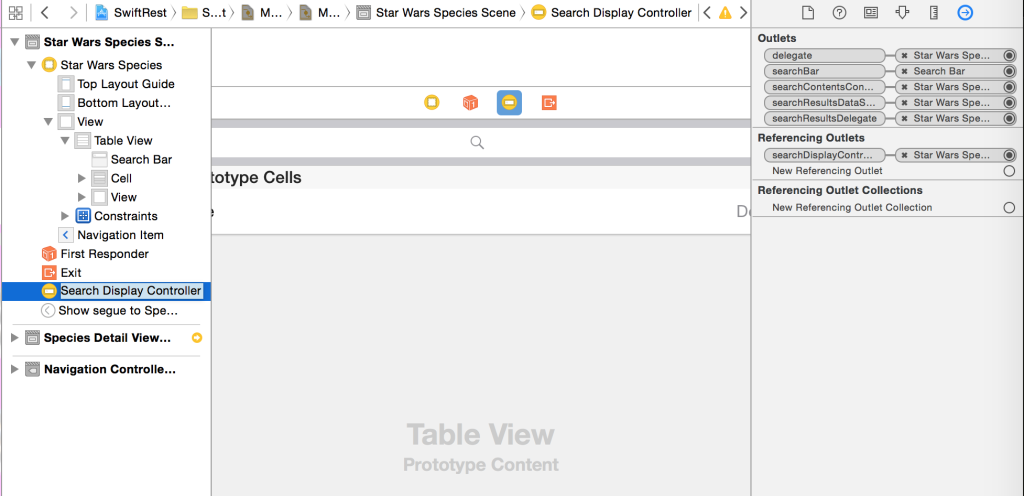
The four references to the tableview from the Search Display Controller would let us break up the code to organize it if it got unwieldy. For our simple little app we can leave them as they are.
You can now run the app. You’ll find that you can tap on the search bar and enter text but you always see all of the species in the results. That’s because we haven’t implemented how the search should work yet.
Why do we see all of the species instead of nothing? Because of the automatic connections Xcode made. The tableview that’s used to display the search results (which isn’t your original tableview) is using the same data source methods as your main species tableview. So it’s just always showing a list of all of the species.
Filtering Search Results
The first thing we need to do is to add an array to our view controller to hold the search results:
var speciesSearchResults:Array<StarWarsSpecies>?
And we should make it explicit that our ViewController class is implementing the search bar protocols UISearchBarDelegate & UISearchDisplayDelegate:
class ViewController: UIViewController, UITableViewDataSource, UITableViewDelegate, UISearchBarDelegate, UISearchDisplayDelegate {
  ...
}
We’ll need a function we can call to do the filtering. It’ll take a search string and fill the new speciesSearchResults array with just the species whose name contains that search string:
func filterContentForSearchText(searchText: String) {
  // Filter the array using the filter method
  if self.species == nil {
    self.speciesSearchResults = nil
    return
  }
  self.speciesSearchResults = self.species!.filter({( aSpecies: StarWarsSpecies) -> Bool in
    // to start, let's just search by name
    return aSpecies.name!.lowercaseString.rangeOfString(searchText.lowercaseString) != nil
  })
}
Using lowercaseString on both the species name and the search text makes the search case insensitive.
For our simple name search, we only need to call this function when the search string changes. Later we’ll update the app to let us search different fields like the species classification or language.
The function to handle changes to the search string is searchDisplayController:shouldReloadTableForSearchString:. So that’s where we’ll call our search filtering function:
func searchDisplayController(controller: UISearchDisplayController!, shouldReloadTableForSearchString searchString: String!) -> Bool {
  self.filterContentForSearchText(searchString)
  return true
}
Displaying Search Results
While our speciesSearchResults array will now hold the search results, there’s no code that says how to display them. Fortunately the search bar controller uses a tableview so we can just tweak the existing tableview data source methods based on whether we’re currently searching or not. If we’re searching, display just the search results. If not, display all of the species.
First we need to update the numberOfRows function:
func tableView(tableView: UITableView, numberOfRowsInSection section: Int) -> Int {
  if tableView == self.searchDisplayController!.searchResultsTableView {
    return self.speciesSearchResults?.count ?? 0
  } else {
    return self.species?.count ?? 0
  }
}
We can tell when we’re searching by checking which tableview is being used. The searchDisplayController uses it’s own searchResultsTableView to display the results.
The cellForRowAtIndexPath function needs a handful of changes. First we need to get a cell that we can use. Previously we used
var cell = tableview.dequeueReusableCellWithIdentifier("Cell", forIndexPath: indexPath) as! UITableViewCell
But the search tableview won’t know anything about our “Cell” cells that we set up in the storyboard for our main tableview. So we’ll always ask the main tableview to generate the cells:
var cell = self.tableview!...
That also means that we can’t use the indexPath anymore since it won’t necessarily match between the two tableviews. Fortunately there’s another version of dequeueReusableCellWithIdentifier that doesn’t require an indexPath:
var cell = self.tableview!.dequeueReusableCellWithIdentifier("Cell") as! UITableViewCell
The difference is that the version with the indexPath will automatically resize the cells (so use it unless you have a reason not too, like multiple tableviews sharing cells). That’s no big deal for us since we’re using standard sized cells but if you’re doing something more complex with custom or variable sized cells you’ll probably need to implement the heightForRow function instead of just setting the values in the storyboard or relying on autolayout.
So now we’ve got a cell. Next we need to figure out what data to stick in it, depending on whether we’re searching or not:
var arrayOfSpecies:Array<StarWarsSpecies>?
if tableView == self.searchDisplayController!.searchResultsTableView {
  arrayOfSpecies = self.speciesSearchResults
} else {
  arrayOfSpecies = self.species
}
Then we’ll just replace self.species with arrayOfSpecies everywhere to give us our final cellForRowAtIndexPath function:
func tableView(tableView: UITableView, cellForRowAtIndexPath indexPath: NSIndexPath) -> UITableViewCell {
  var cell = self.tableview!.dequeueReusableCellWithIdentifier("Cell") as! UITableViewCell

  var arrayOfSpecies:Array<StarWarsSpecies>?
  if tableView == self.searchDisplayController!.searchResultsTableView {
    arrayOfSpecies = self.speciesSearchResults
  } else {
    arrayOfSpecies = self.species
  }

  if arrayOfSpecies != nil && arrayOfSpecies!.count >= indexPath.row
  {
    let species = arrayOfSpecies![indexPath.row]
    // fill in title, image, etc.
    // see https://grokswift.com/uitableviewcell-images-from-api/ for details

    if tableView != self.searchDisplayController!.searchResultsTableView {
      // Load more species if needed
      // see https://grokswift.com/rest-tableview-in-swift/ for details
    }
  }

  return cell
}
Now save & run. Your search should work but tapping on the search results won’t show take you to their detail views. That’s because we haven’t updated the segue to work with the search results yet.
Segues from Search Results
In the prepare for segue transition, we don’t get passed the tableview. Instead we have to ask the search controller explicitly if it’s currently searching using self.searchDisplayController!.active. Then we can grab the species data from the correct array to pass to the detail view:
override func prepareForSegue(segue: UIStoryboardSegue, sender: AnyObject?) {
  super.prepareForSegue(segue, sender: sender)
  if let speciesDetailVC = segue.destinationViewController as? SpeciesDetailViewController
  {
      // gotta check if we're currently searching
      if self.searchDisplayController!.active {
        let indexPath = self.searchDisplayController?.searchResultsTableView.indexPathForSelectedRow()
        if indexPath != nil {
          speciesDetailVC.species = self.speciesSearchResults?[indexPath!.row]
        }
      } else {
        let indexPath = self.tableview?.indexPathForSelectedRow()
        if indexPath != nil {
          speciesDetailVC.species = self.species?[indexPath!.row]
        }
      }
  }
}
Save & run and test out your search function and transitions to the detail views.
Search Scope
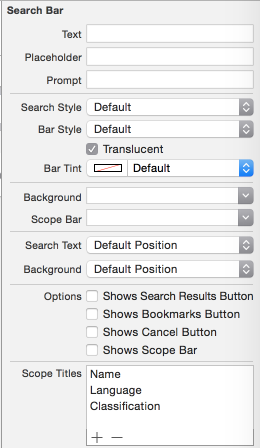
The iOS UISearchBar makes it dead easy to add a scope bar so users can change what they’re searching through. First in Interface Builder add 3 scope titles: Name, Language, and Classification:
Then we need to adjust our filter function to use the scope. We need to get the current scope from the search bar:
let selectedIndex = controller.searchBar.selectedScopeButtonIndex
Then we need to make our search function use it (make sure the scopes in the switch statement are in the same order that you used in Interface Builder):
func filterContentForSearchText(searchText: String, scope: Int) {
  // Filter the array using the filter method
  if self.species == nil {
    self.speciesSearchResults = nil
    return
  }
  self.speciesSearchResults = self.species!.filter({( aSpecies: StarWarsSpecies) -> Bool in
    var fieldToSearch: String?
    switch (scope) {
      case (0):
        fieldToSearch = aSpecies.name
      case (1):
        fieldToSearch = aSpecies.language
      case (2):
        fieldToSearch = aSpecies.classification
      default:
        fieldToSearch = nil
    }
    if fieldToSearch == nil {
      self.speciesSearchResults = nil
      return false
    }
    return fieldToSearch!.lowercaseString.rangeOfString(searchText.lowercaseString) != nil
  })
}
We need to update the search tableview update function to use the scope:
func searchDisplayController(controller: UISearchDisplayController!, shouldReloadTableForSearchString searchString: String!) -> Bool {
  let selectedIndex = controller.searchBar.selectedScopeButtonIndex
  self.filterContentForSearchText(searchString, scope: selectedIndex)
  return true
}
The search should also reload when the scope changes, not just when the search text changes so we’ll have to implement the searchDisplayController:shouldReloadTableForSearchScope: fuction:
func searchDisplayController(controller: UISearchDisplayController, shouldReloadTableForSearchScope searchOption: Int) -> Bool {
  let searchString = controller.searchBar.text
  self.filterContentForSearchText(searchString, scope:searchOption)
  return true
}
And That’s All
Save & run. You’ll be able to do searches like which species from the Star Wars universe are mammals:
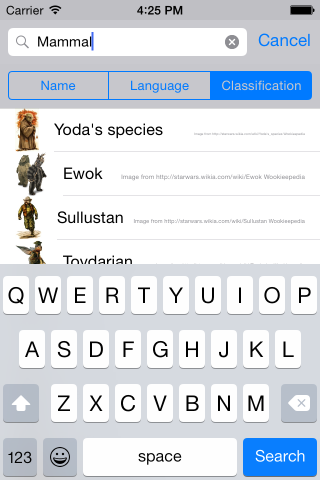
We took our API-backed tableview and added a search bar. We added scope to our search so we can search different fields.
If you’d like more Swift tutorials like this one, sign up below to get them sent directly to your inbox. Feel free to come back and visit too, we’re pretty friendly around here but we’ll understand if it’s just easier for us to come to you :)