 Grok Swift
March 18, 2015
tl;dr: Alamofire can be used to do Basic or HTTP header auth. Demo code for building a Swift app with a REST APIs using Parse takes about 2/3 of this post. Go straight to the core code for Basic Auth or HTTP header auth.
If you’re building an app based on a REST API you’re probably going to need to authenticate at some point. You might even need to authenticate to make any REST calls at all. Today we’ll set up a simple app using Parse as a backend. Using Alamofire, we’ll set up two types of authentication: basic auth and HTTP headers.

This tutorial has been updated to use Swift 2.0, Xcode 7.0, and Alamofire v3.0.0.
Parse is a back-end as a service (BaaS) provider. The cool kids might call it a cloud database. It’s got some fancy features but today we only care that it’ll give us a database accessible through REST calls. As usual, we’ll use Alamofire & SwiftyJSON for our networking and JSON parsing needs.
Aside: If you’re really building an iOS app against Parse you probably want to use their iOS SDK, not the REST API. But we want to practice using a REST API so we’re going to pretend their iOS SDK doesn’t exist.
In this tutorials we’ll start building an app that can show a list of locations. Think of it as a really rudimentary Yelp or Foursquare/Swarm. In future tutorials we’ll will allow users to check-in to “spots” and to rate them. It’ll eventually have a list of spots, user accounts and reviews. Today we’ll only deal with locations (actually, just one location will do for now). We will:
- Set up a Parse account with a single database table
- Create a Swift project with a class that matches our database table
- Use Alamofire to make a GET request to get the “spots”
- Add headers to our Alamofire request so our GET request doesn’t fail
Getting Started with Parse
The first thing we need to do is to create a free Parse account. Head on over to the Parse Sign Up page and sign up for a free account. Fill in the form (choose “Individual Developer” and the company fields will disappear).
Once you have an account, select the “Data” product to add to your project (Data ->> Mobile -> iOS -> Objective-C -> New Project) (Yeah, that’s not Swift. It doesn’t actually matter much because we’re not going to use the Parse SDK, we’re here for a REST API. We could’ve picked a javascript project and gotten what we need.)
Then find and copy your ApplicationID & clientKey:
[Parse setApplicationId:@"abcdef12345"
              clientKey:@"yxz890"];
You’ll need these values a little bit later. You’ll also need your Javascript key for basic authentication. To find it, go to your Parse project -> Settings (at the top) -> Keys -> Javascript Key. Copy it too.
Adding Data in Parse
While you’re still logged in to your Parse account, we should add some data so we’ll have something to retrieve:
- Go to the Data view
- Click “Add a Parse Class”
- Create a “Spot” class
- Add 2 columns: title as string, location as geopoint. Those are the properties of our class (at least for now)
- Then add a row (i.e., a Spot object), e.g., set title & location to whatever you’d like. I used “My Cafe”, location to (43,-80). You can add a few rows if you’re a real keener or don’t like the look of tableviews with a single row.
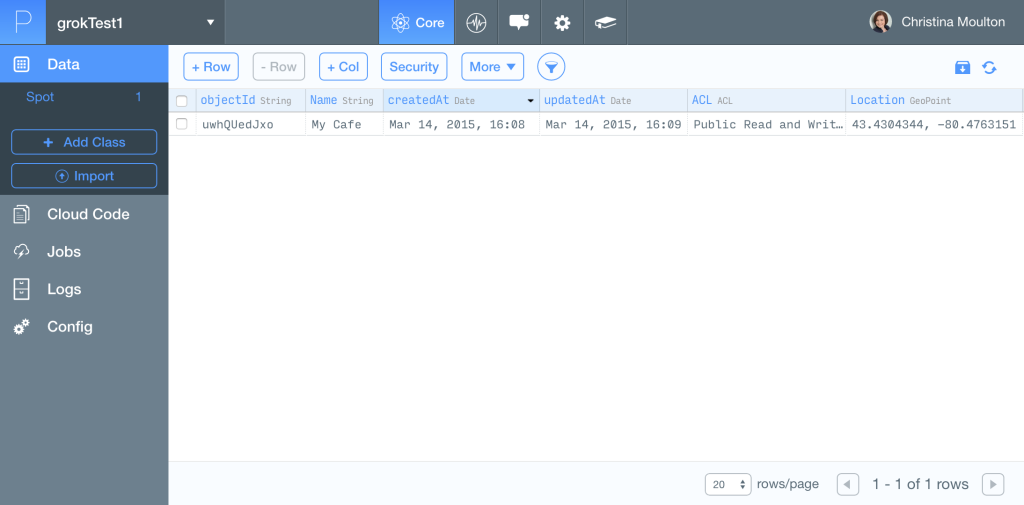
And that’s all we need to do in Parse. You’ll notice that Parse has automatically created a few fields: objectId, createdAt, updatedAt and ACL. These fields can’t be removed. The first few are pretty much self-explanatory: objectId uniquely identifies each object in the database, createdAt & updatedAt are dates. ACL is for access control. It specifies who owns an object, who can see it and who can change it.
The Docs
If you’re the type who likes to dig into documentation, read up on the Parse REST API docs.
If we check out the Request Format section we’ll find a few requirements:
- POST & PUT requests need to set the Content-Type header to
application/json. (We won’t be using that today but Alamofire makes it easy.) - All requests need to include headers for authentication. The headers include the App ID and the client key, i.e., those two values you copied down just after creating your project.
- Alternatively, you can use Basic Auth for your requests. For that you’ll need the javascript key (that you also copied down earlier).
If we keep reading a bit, we’ll see that errors are returned as JSON so we’ll need to check for those when we’re parsing the JSON responses.
Our Swift Project
Now that we’ve got our Parse project all set up we can create our Swift project (if you don’t want to type along, grab the final code from GitHub):
Fire up Xcode.
Create a new master-detail Swift project (make it universal if you want to).
Add Alamofire 3.0.0 & SwiftyJSON 2.3.0 using CocoaPods.
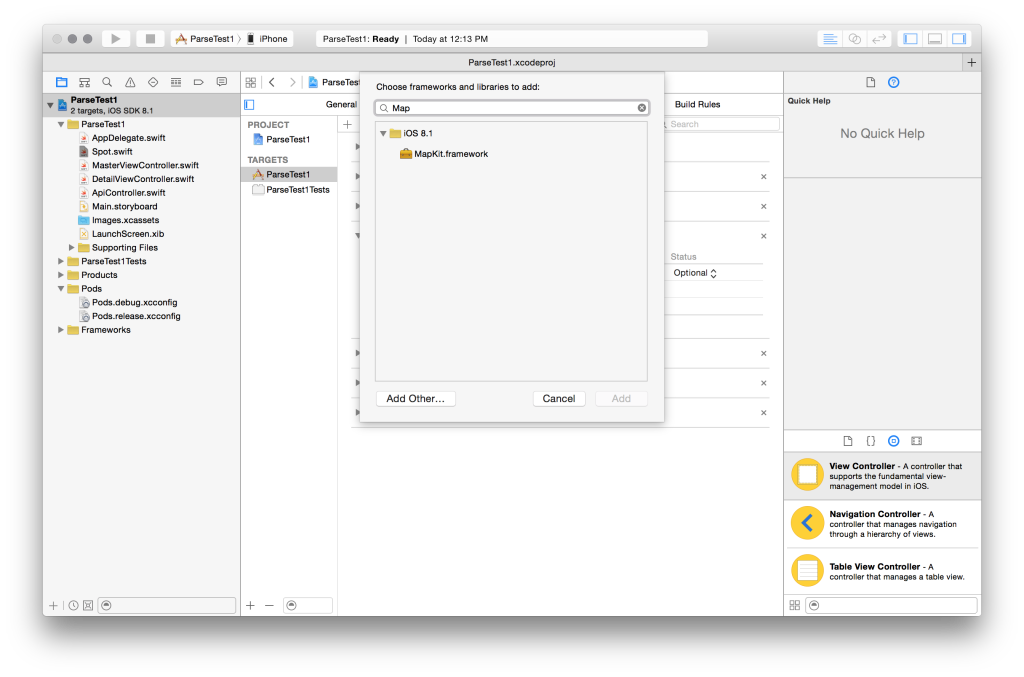
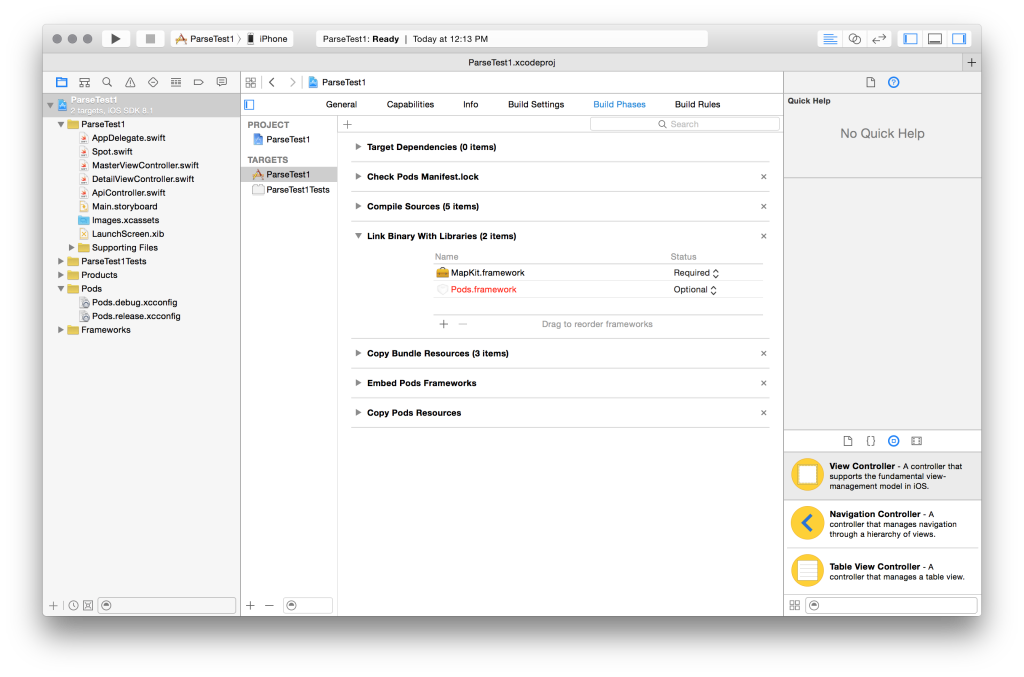
Add MapKit so we can use its coordinate class:
Create the Spot class in a new file (Spot.swift) with 3 properties (we don’t need the dates or ACL for now):
import Foundation
import MapKit

class Spot {
  let name: String
  let location: CLLocationCoordinate2D
  let id: Int?

  required init(aName: String, aLat: Double, aLon: Double, anId: Int?)
  {
    name = aName
    location = CLLocationCoordinate2D(latitude: aLat, longitude: aLon)
    id = anId
  }
}
In MasterViewController, rename objects to spots and use a Swift array: var spots = [Spot](). Comment out the contents of insertNewObject so the code will compile:
func insertNewObject(sender: AnyObject) {
  /*spots.insert(NSDate(), atIndex: 0)
  let indexPath = NSIndexPath(forRow: 0, inSection: 0)
  self.tableView.insertRowsAtIndexPaths([indexPath], withRowAnimation: .Automatic)*/
}
In the storyboard, change the prototype cell style to Right Detail (so can can display the spot name and location, the default cell style only has 1 label).
In MasterViewController, change cellForRowAtIndexPath to use our Spot class:
override func tableView(tableView: UITableView, cellForRowAtIndexPath indexPath: NSIndexPath) -> UITableViewCell {
  let cell = tableView.dequeueReusableCellWithIdentifier("Cell", forIndexPath: indexPath)

  let spot = spots[indexPath.row]
  cell.textLabel!.text = spot.name
  cell.detailTextLabel?.text = "\(spot.location.latitude), \(spot.location.longitude)"
  return cell
}
Now, We want to get a list of all spots. According to the Parse docs we can use either HTTP headers or basic auth. Let’s start by setting up the Alamofire GET call, then add the authentication.
Loading & Displaying Data
We’ll need to be able to include our keys in our calls but I don’t want to show you mine 😉 So we’ll hide away some details in a plist. Add a plist file to your project called keys.plist and fill it in with your keys:
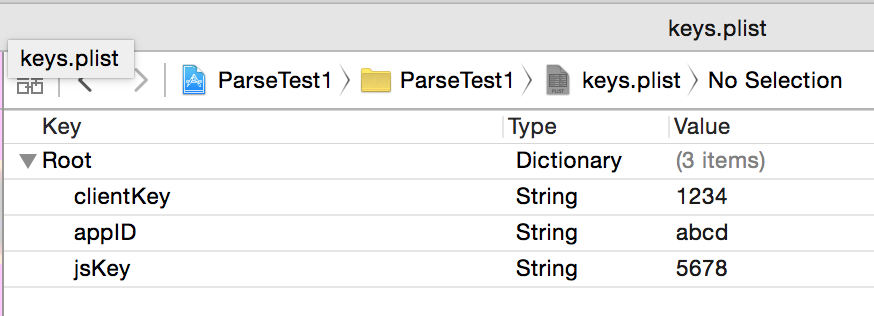 Plist with API Keys & IDs
The endpoint that we want to call is https://api.parse.com/1/classes/Spot/. If we succeed the results will look like this:
{
  "results": [
    {
      "Location": {
        "__type": "GeoPoint",
        "latitude": 43.4304344,
        "longitude": -80.4763151
      },
      "Name": "My Cafe",
      "createdAt": "2015-03-14T16:08:03.430Z",
      "objectId": "uwhQUedJxo",
      "updatedAt": "2015-03-14T16:09:04.355Z"
    }
  ]
}
Create a new file: ApiController.swift. It’ll hold our API related code.
We need to import Alamofire & SwiftyJSON then load up those keys from the plist. Since we’re using authentication it could be useful if it persisted through multiple API calls, so let’s instantiate an Alamofire.Manager that we’ll use for all of our calls. With Alamofire, you can use class functions without explicitly instantiating a manager like Alamofire.request(...) or you can use a manager to make similar calls myManager.request(...).
import Foundation
import Alamofire
import SwiftyJSON

enum KeyFields: String {
  case appID = "appID"
  case jsKey = "jsKey"
  case clientKey = "clientKey"
}

class APIController {
  var manager: Alamofire.Manager
  let keys: NSDictionary?

  required init() {
    let configuration = NSURLSessionConfiguration.defaultSessionConfiguration()
    manager = Alamofire.Manager(configuration: configuration)
    if let path = NSBundle.mainBundle().pathForResource("keys", ofType: "plist") {
      keys = NSDictionary(contentsOfFile: path)
    } else {
      keys = nil
    }
  }
}
To handle the response and parse the JSON, we’ll need a custom serializer (see Strongly-Typed GET and POST Calls with Alamofire for details on how to set up the response serializer & request):
extension Alamofire.Request {
  func responseSpotsArray(completionHandler: (Response<[Spot], NSError>) -> Void) -> Self {
    let serializer = ResponseSerializer<[Spot], NSError> { request, response, data, error in
      guard error == nil else {
        return .Failure(error!)
      }
      guard let responseData = data else {
        let failureReason = "Array could not be serialized because input data was nil."
        let error = Error.errorWithCode(.DataSerializationFailed, failureReason: failureReason)
        return .Failure(error)
      }

      let JSONResponseSerializer = Request.JSONResponseSerializer(options: .AllowFragments)
      let result = JSONResponseSerializer.serializeResponse(request, response, responseData, error)

      if result.isSuccess {
        if let value = result.value {
          let json = SwiftyJSON.JSON(value)
          if let errorString = json["error"].string {
            return .Failure(NSError(domain: "parseAPICall", code: 200, userInfo: [NSLocalizedDescriptionKey: errorString]))
          }
          var allSpots = Array<Spot>()
          let results = json["results"]
          for (_, jsonSpot) in results
          {
            let id = jsonSpot["objectId"].intValue
            let name = jsonSpot["Name"].stringValue
            let lat = jsonSpot["Location"]["latitude"].doubleValue
            let lon = jsonSpot["Location"]["longitude"].doubleValue
            let spot = Spot(aName: name, aLat: lat, aLon: lon, anId: id)
            allSpots.append(spot)
          }
          return .Success(allSpots)
        }
      }

      let error = Error.errorWithCode(.JSONSerializationFailed, failureReason: "JSON could not be converted to object")
      return .Failure(error)
    }

    return response(responseSerializer:serializer, completionHandler: completionHandler)
  }
}
In the middle of the JSON parsing in the custom response serializer we’ve added a check for json["error"]. That’s to handle the error parameter that Parse will return if we mess up.
And we can set up our getSpotsWithBasicAuth function to use the serializer & request:
class APIController {
  ...
  func getSpotsWithBasicAuth(completionHandler: (Result<[Spot], NSError>) -> Void) {
    manager.request(.GET, "https://api.parse.com/1/classes/Spot/")
      .responseSpotsArray { response in
        completionHandler(response.result)
      }
  }
}
Finally in MasterViewController, let’s set up our tableview to load those spots when the view controller is about to appear:
class MasterViewController: UITableViewController {
  var detailViewController: DetailViewController? = nil
  var spots = [Spot]()
  // Add var to hold APIController so it doesn't get released
  var apiController = APIController()
  ...

  override func viewWillAppear(animated: Bool) {
    self.clearsSelectionOnViewWillAppear = self.splitViewController!.collapsed
    self.getSpots()

    super.viewWillAppear(animated)
  }

  // MARK: API
  func getSpots()
  {
    apiController.getSpotsWithBasicAuth({ result in
      guard result.error == nil else {
        // TODO: improved error handling
        let alert = UIAlertController(title: "Error", message: "Could not load spots \nError message:\n \(result.error!.localizedDescription)", preferredStyle: UIAlertControllerStyle.Alert)
        alert.addAction(UIAlertAction(title: "OK", style: UIAlertActionStyle.Default, handler: nil))
        self.presentViewController(alert, animated: true, completion: nil)
        return;
      }

      if let newSpots = result.value {
        self.spots += newSpots
      }

      self.tableView?.reloadData()
    })
  }
  ...
}
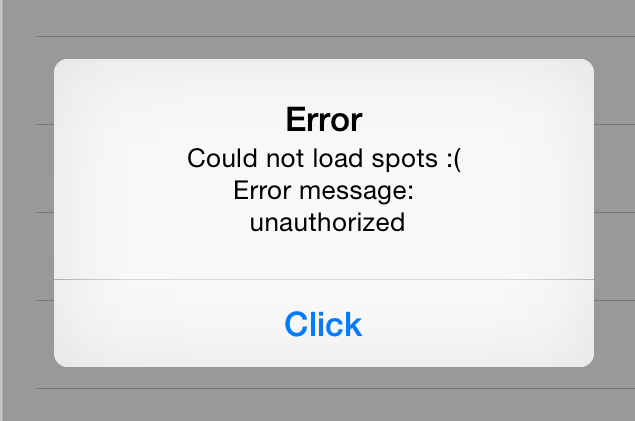
Now that’s all setup but without any authentication. Build & run and you should see that you get an “unauthorized” error:
So we need to fix the getSpotsWithBasicAuth function to authenticate.
Basic Auth
To set this up, all you need to know is that Basic auth uses a username and password. If you’re curious about the inner workings, Wikipedia has a good explanation of how they get packaged into a header.
Checking the Parse documentation (under Request Format), they use the app ID in place of the username and javascript-key:myJSKey in place of the password. Notice that’s the javascript key, not the client key or REST API key. Make sure you have them right in your plist.
First we’ll get the values for the keys, tossing an error if we can’t get them. Then we’ll chain an extra function into our Alamofire request: .authenticate(user: username, password: password). That function call with pack up the inputs into the appropriate header for us and handle auth challenges:
func getSpotsWithBasicAuth(completionHandler: (Result<[Spot], NSError>) -> Void) {
  let appID = keys?[KeyFields.appID.rawValue] as? String
  let jsKey = keys?[KeyFields.jsKey.rawValue] as? String
  if appID == nil || jsKey == nil {
    let error = NSError(domain: "parseAPICall", code: 200, userInfo: [NSLocalizedDescriptionKey: "Could not load API keys from keys.plist"])
    completionHandler(.Failure(error))
    return
  }

  let username = appID!
  // note: javascript key is different from REST API key, get it from
  // Parse project -> Settings (at top) -> Keys -> Javascript Key
  let password = "javascript-key=" + jsKey!

  manager.request(.GET, "https://api.parse.com/1/classes/Spot/")
    .authenticate(user: username, password: password)
    .responseSpotsArray { response in
      completionHandler(response.result)
    }
}
Alternatively, you can pack up the username and password in an NSURLCredential:
let credential = NSURLCredential(user: username, password: password, persistence: NSURLCredentialPersistence.ForSession)
  manager.request(.GET, "https://api.parse.com/1/classes/Spot/")
    .authenticate(usingCredential: credential)
    .responseSpotsArray { response in
      completionHandler(response.result)
    }
Using a credential lets you specify how long the authentication should live (one call, one session or forever) as NSURLCredentialPersistence. It also works with certificate-based authentication, if you’re headed down that road.
HTTP Header Authentication
Instead of using basic auth, we can use HTTP headers with Alamofire and Parse. Like before, first we’ll get the values for the keys, tossing an error if we can’t get them.
Then we’ll set up our headers. According to the Parse docs, We need two headers X-Parse-Application-Id and X-Parse-Client-Key with values from our app ID and client key, respectively. You can add extra headers to an Alamofire manager through the HTTPAdditionalHeaders parameter. They’re stored in the configuration in the session: manager.session.configuration.HTTPAdditionalHeaders. Once we’ve set them for our manager they’ll stay set for the rest of our session. So the call to manager.request(...) doesn’t need to be changed, it’ll pick them up automatically.
func getSpotsWithBasicAuth(completionHandler: (Result<[Spot], NSError>) -> Void) {
  let appID = keys?[KeyFields.appID.rawValue] as? String
  let jsKey = keys?[KeyFields.jsKey.rawValue] as? String
  let clientKey = keys?[KeyFields.clientKey.rawValue] as? String
  if appID == nil || jsKey == nil {
    let error = NSError(domain: "parseAPICall", code: 200, userInfo: [NSLocalizedDescriptionKey: "Could not load API keys from keys.plist"])
    completionHandler(.Failure(error))
    return
  }

  let username = appID!
  // note: javascript key is different from REST API key, get it from
  // Parse project -> Settings (at top) -> Keys -> Javascript Key
  let password = "javascript-key=" + jsKey!

  // add our auth headers
  manager.session.configuration.HTTPAdditionalHeaders = [
    "X-Parse-Application-Id": appID!,
    "X-Parse-Client-Key": clientKey!
  ]

  manager.request(.GET, "https://api.parse.com/1/classes/Spot/")
    .authenticate(user: username, password: password)
    .responseSpotsArray { response in
      completionHandler(response.result)
    }
}
And that’s all you need to set up HTTP header authentication with Alamofire in Swift. Save & run to make sure it’s working.
Alamofire Validation
Alamofire has a .validate() method that can be chained into your requests like so:
manager.request(.GET, path)
  .validate()
  .responseSpotsArray { (request, response, spots, error) in
    completionHandler(spots, error)
}
If you don’t include the call to .validate then Alamofire will assume that the call succeeded. The .validate() call only fails if the content-type of the response isn’t what we expect or the status code isn’t 200-299. In older versions of Alamofire validate could hide more descriptive errors since your custom serializers wouldn’t get called if there was already an error. As of v3.0.0 that’s no longer the case.
But as our code is written the validate error will hide more descriptive errors in the JSON since we’re returning at the start of the serializer if we detect an error:
let serializer = ResponseSerializer<[Spot], NSError> { request, response, data, error in
  guard error == nil else {
    return .Failure(error!)
  }
  ...
}
To get more descriptive error messages, let’s move the check for an existing error to after the JSON parsing:
let serializer = ResponseSerializer<[Spot], NSError> { request, response, data, error in
  guard let responseData = data else {
    let failureReason = "Array could not be serialized because input data was nil."
    let error = Error.errorWithCode(.DataSerializationFailed, failureReason: failureReason)
    return .Failure(error)
  }

  let JSONResponseSerializer = Request.JSONResponseSerializer(options: .AllowFragments)
  let result = JSONResponseSerializer.serializeResponse(request, response, responseData, error)

  if result.isSuccess {
    if let value = result.value {
      let json = SwiftyJSON.JSON(value)
      if let errorString = json["error"].string {
        return .Failure(NSError(domain: "parseAPICall", code: 200, userInfo: [NSLocalizedDescriptionKey: errorString]))
      }
      var allSpots = [Spot]()
      let results = json["results"]
      for (_, jsonSpot) in results
      {
        let id = jsonSpot["objectId"].intValue
        let name = jsonSpot["Name"].stringValue
        let lat = jsonSpot["Location"]["latitude"].doubleValue
        let lon = jsonSpot["Location"]["longitude"].doubleValue
        let spot = Spot(aName: name, aLat: lat, aLon: lon, anId: id)
        allSpots.append(spot)
      }
      return .Success(allSpots)
    }
  }

  // Check for error after trying to parse JSON, since sometimes we get descriptive errors in the JSON
  guard error == nil else {
    return .Failure(error!)
  }

  let error = Error.errorWithCode(.JSONSerializationFailed, failureReason: "JSON could not be converted to object")
  return .Failure(error)
}
Now validate won’t hide any errors that come in the JSON response.
And That’s All on Alamofire Authentication (Basic & HTTP Headers)
Alamofire authentication for basic auth or HTTP header auth is easy to set up with Alamofire’s request chaining.
If you’d like more Swift developer tips like this one, sign up below to get them sent directly to your inbox. Feel free to come back and visit too, we’re pretty friendly around here but we’ll understand if it’s just easier for us to come to you.
P.S. If you got tired of typing, here’s the final code: SwiftParseDemo on GitHub.